GliaStory Client guide
Updated 2026-11-04 · app.gliastory.com
Before you start
GliaStory is GliaCloud's ad video service. The AI suggests directions and draws the storyboard. Once the storyboard is final, you see the price and delivery date. After you order, the GliaCloud production team makes the video. The address is app.gliastory.com.
Sign up
GliaStory is invitation-only. Sign up with the invite link your GliaCloud sales representative sent you.
- Open the invite link. The page says “Create the account for …” with your company's name. Sign up with your email address.
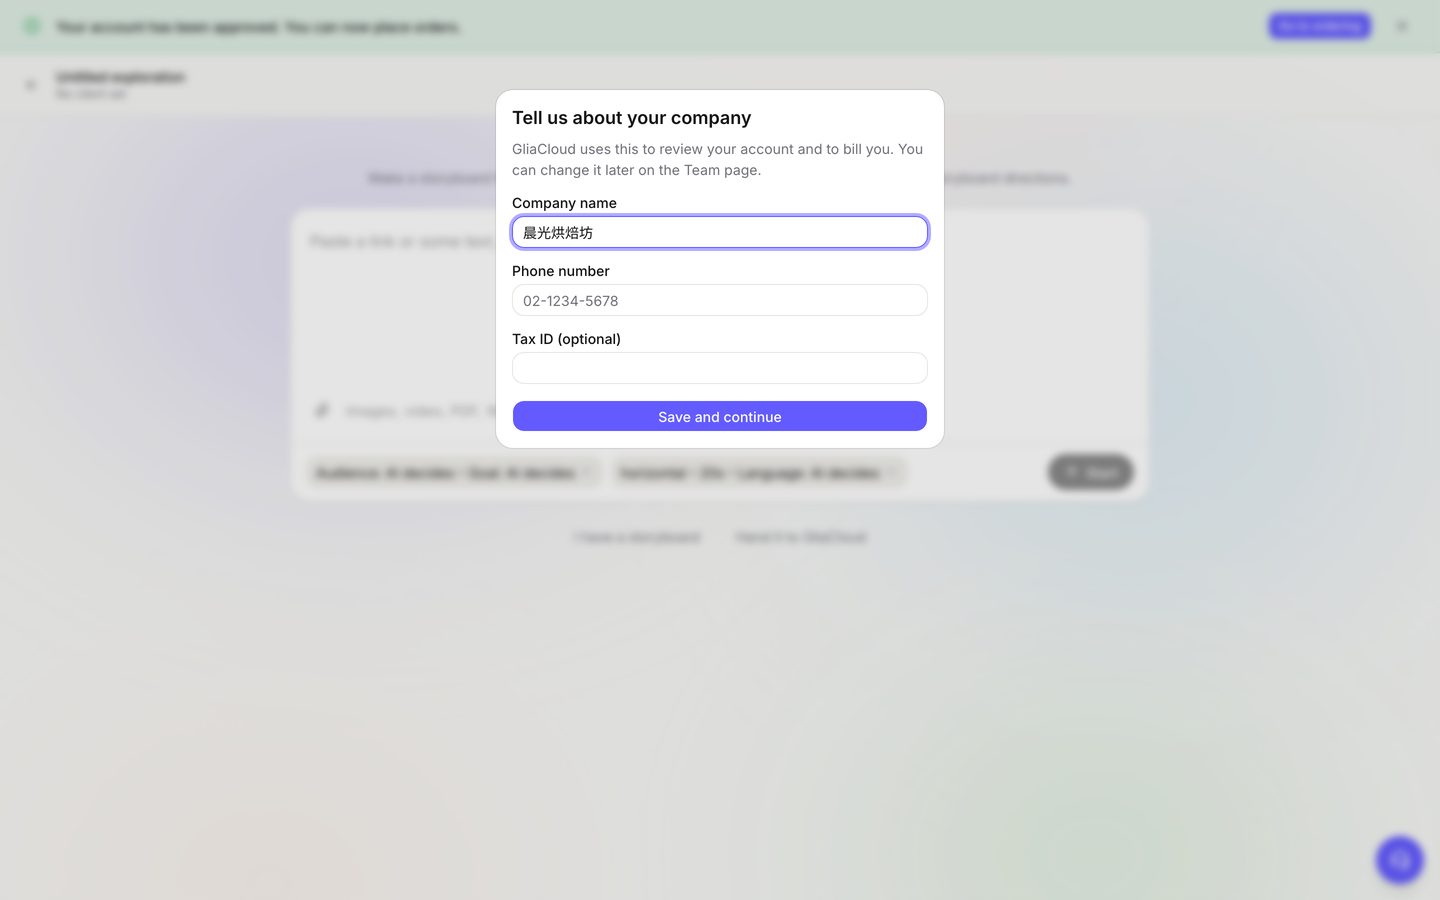
- The first time you sign in, enter your company details. The company name is already filled in. Phone number is required; tax ID or corporate number is optional. You can change them later on the “Team” page.
- An account made through an invite link is activated straight away, so you can start on storyboards and place orders right away.
To invite colleagues, see Team and permissions. If you don't have an invite link, or it has already been used, contact your GliaCloud sales representative.
Finding your way around
The sidebar is on the left; the round button in the bottom-right corner is “Contact support” (see Home for the screen).
| Where | What it's for |
|---|---|
| “Home” | “Weekly orders and completions”, “N projects need attention” for things waiting for you, and “Recent projects” (see Home) |
| “Projects” | All your projects. You can search and filter |
| “Samples” | Sample projects from GliaCloud: every stage, the finished film and its price, view only |
| “Assets” | Images, videos and files you've uploaded, plus a brand kit for each client |
| “Clients” | The clients (brands) you make videos for, with their project counts and amounts |
| “Team” | Invite colleagues and edit company details |
| “Billing” | Monthly statements |
| “What's new” | Recent platform updates |
| Bell icon | Notifications. The red dot shows how many are unread |
| Bottom of the sidebar | Switch the interface language (日本語, English, 繁體中文) and open your account |
The five steps
When you open a project, five stages appear across the top, in order. The stage names are the English words on screen:
| Stage | What you do | Who | Cost |
|---|---|---|---|
| Explore | Add your materials and pick one of three directions | You + AI | Free |
| Storyboard | Check each frame's image, text and voiceover, and edit as needed | You + AI | Free |
| Confirm | Check the quote and delivery date, then order | You | Charged only when you order |
| Review | Watch the first draft, mark changes on the video, and approve | You + production team | Included in the order |
| Final | Download the film, and add other sizes or languages if needed | You + production team | Extra versions charged separately |
Home and the project list
Home
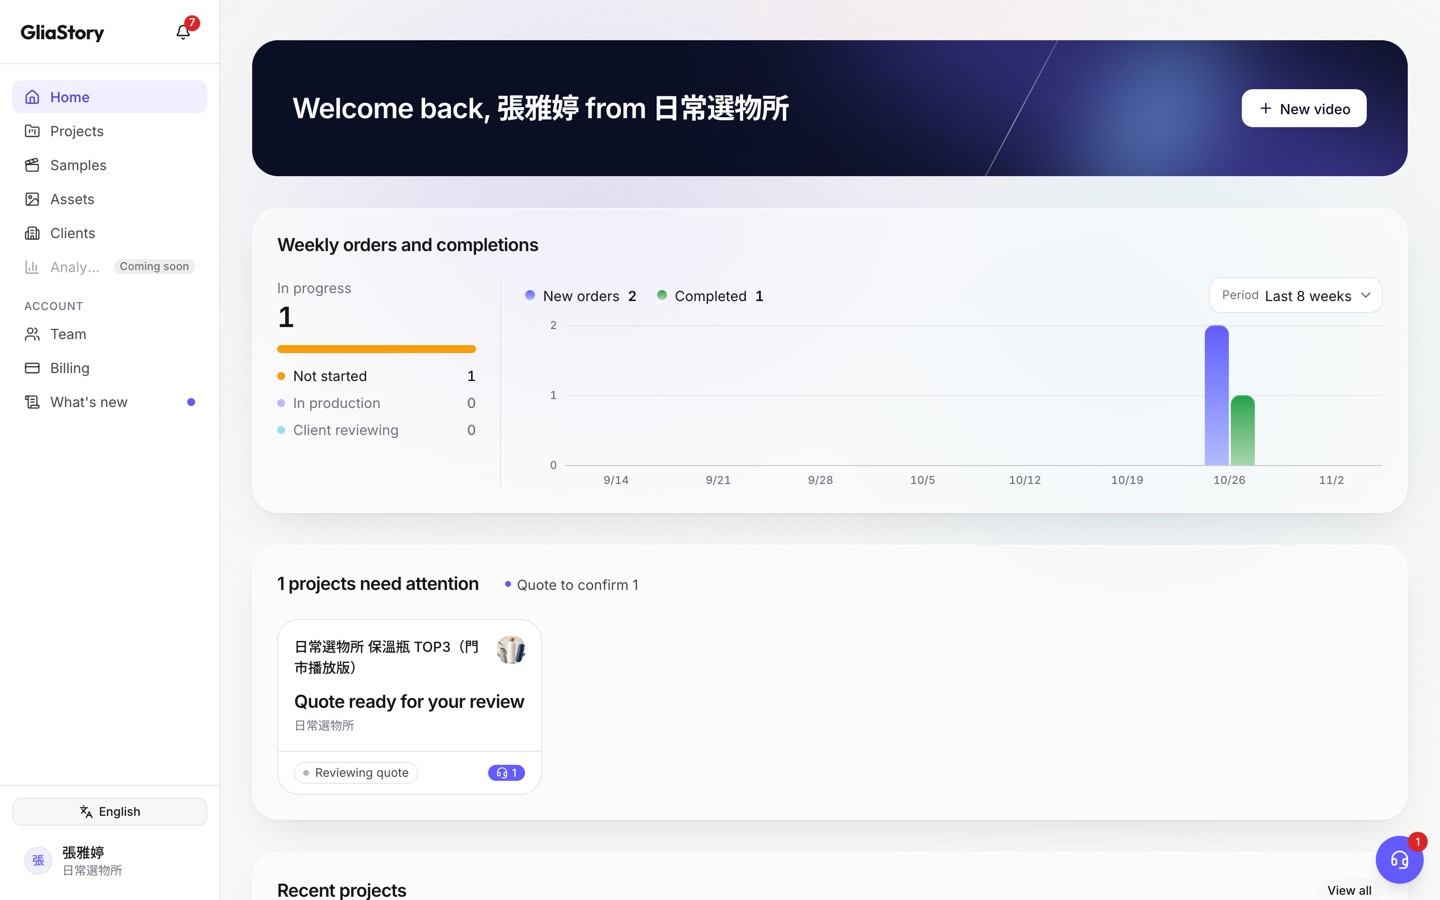
- “New video”: in the welcome bar at the top; starts a new project.
- “Weekly orders and completions”: “In progress” on the left counts the films you've ordered that aren't finished yet, split into “Not started”, “In production” and “Client reviewing”. The chart on the right shows “New orders” and “Completed” by week; switch the “Period” at the top right to “Last 4 weeks”, “Last 8 weeks”, “Last 12 weeks” and more.
- “N projects need attention”: projects waiting for you, with the reason beside the heading (for example “Quote to confirm”). Each card says the next step, for example “Quote ready for your review”; click it to go to that stage. With more than 4, click “Show all N” to open the rest.
- “Recent projects”: projects changed most recently, with a search box. “View all” goes to the “Projects” page.
The project list
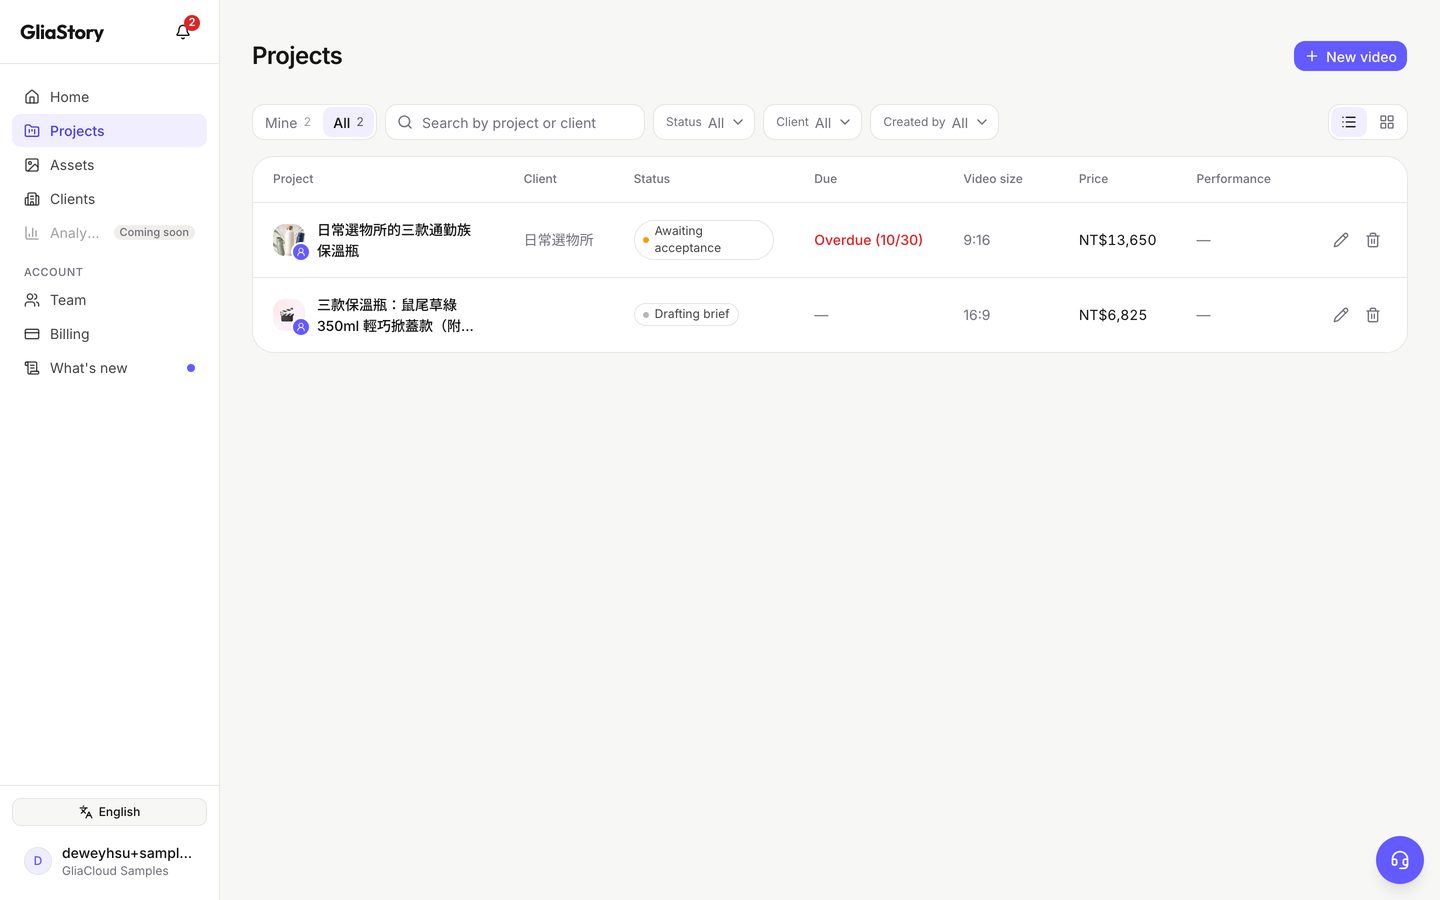
- “New video” (top right): start a new project.
- “Mine” / “All”: show only projects you created, or all of your team's projects.
- Filters: narrow the list by “Status”, “Client” or “Created by”, or type a project or client name in the search box.
- Each row: shows the current status (for example “Drafting brief” or “Awaiting acceptance”), the delivery date and the price. Past-due projects are marked “Overdue” in red.
- Pencil icon: rename the project. Trash icon: delete it.
New project: three ways to start
Click “New video” and you'll see “Start a video storyboard”. Two links under the input box switch between three ways to start:
| Way | Best when |
|---|---|
| Bring your own materials (default) | You have a product URL, documents or images, and want the AI to suggest directions and a storyboard |
| “I have a storyboard” | You already have a storyboard of your own |
| “Hand it to GliaCloud” | You don't have time to prepare materials and want the production team to draw the storyboard |
Bring your own materials
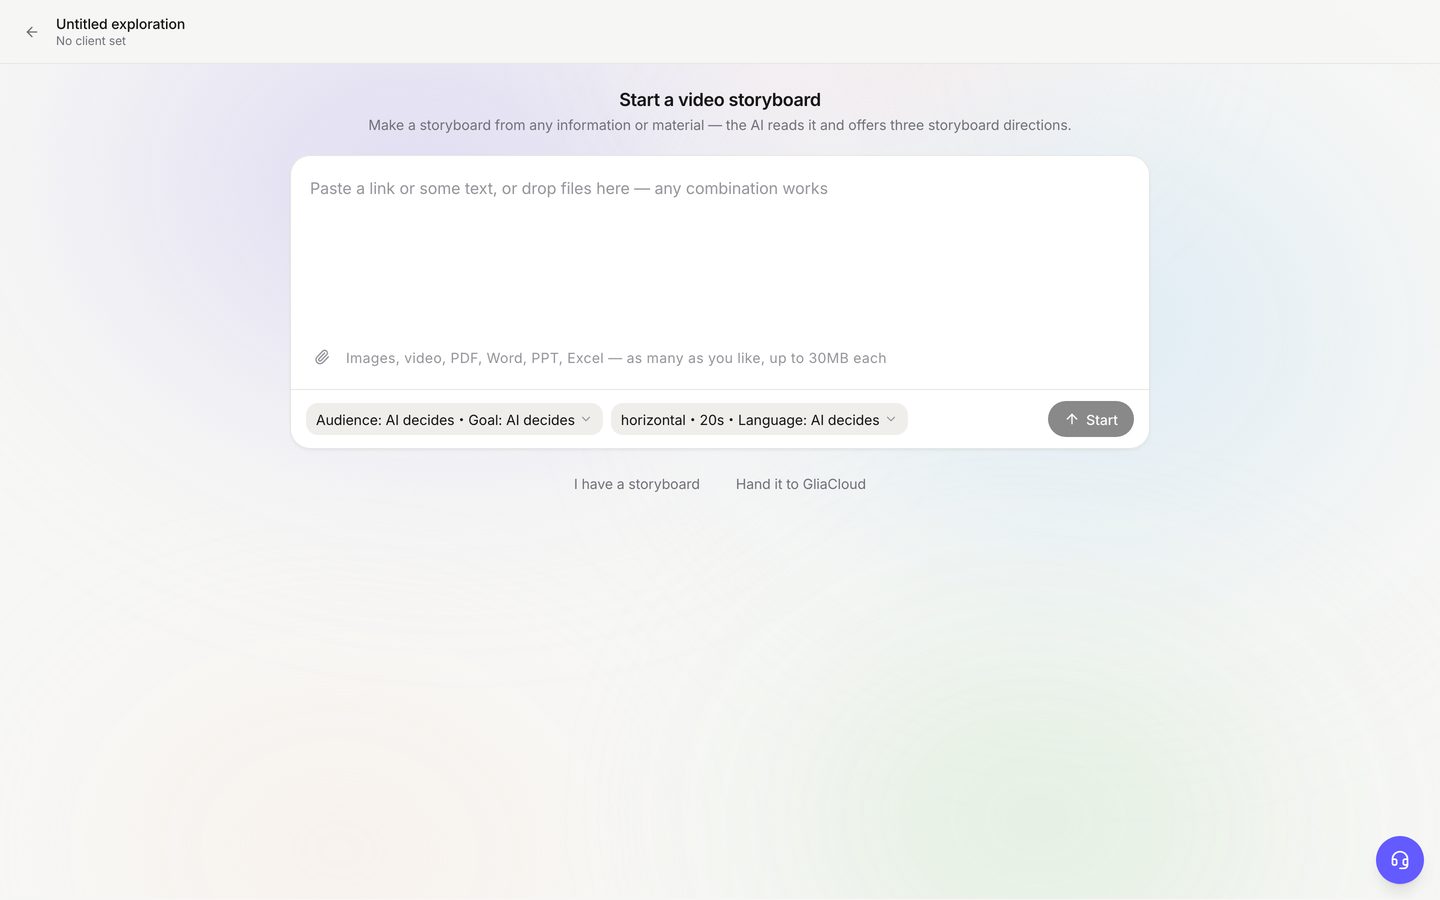
- Paste a product URL or some text into the input box, or drop in files. Click the paperclip icon to upload images, video, PDF, Word, PPT or Excel files. You can add several, up to 30MB each.
- Click the settings button on the left (by default “Audience: AI decides • Goal: AI decides”) to choose who the video is for and what you want them to do after watching.
- Click the settings button on the right (for example “horizontal • 20s • Language: AI decides”) to choose the look, aspect ratio, length, language and platform.
- Click “Start”. The AI reads your materials and suggests three directions. This takes a minute or two.
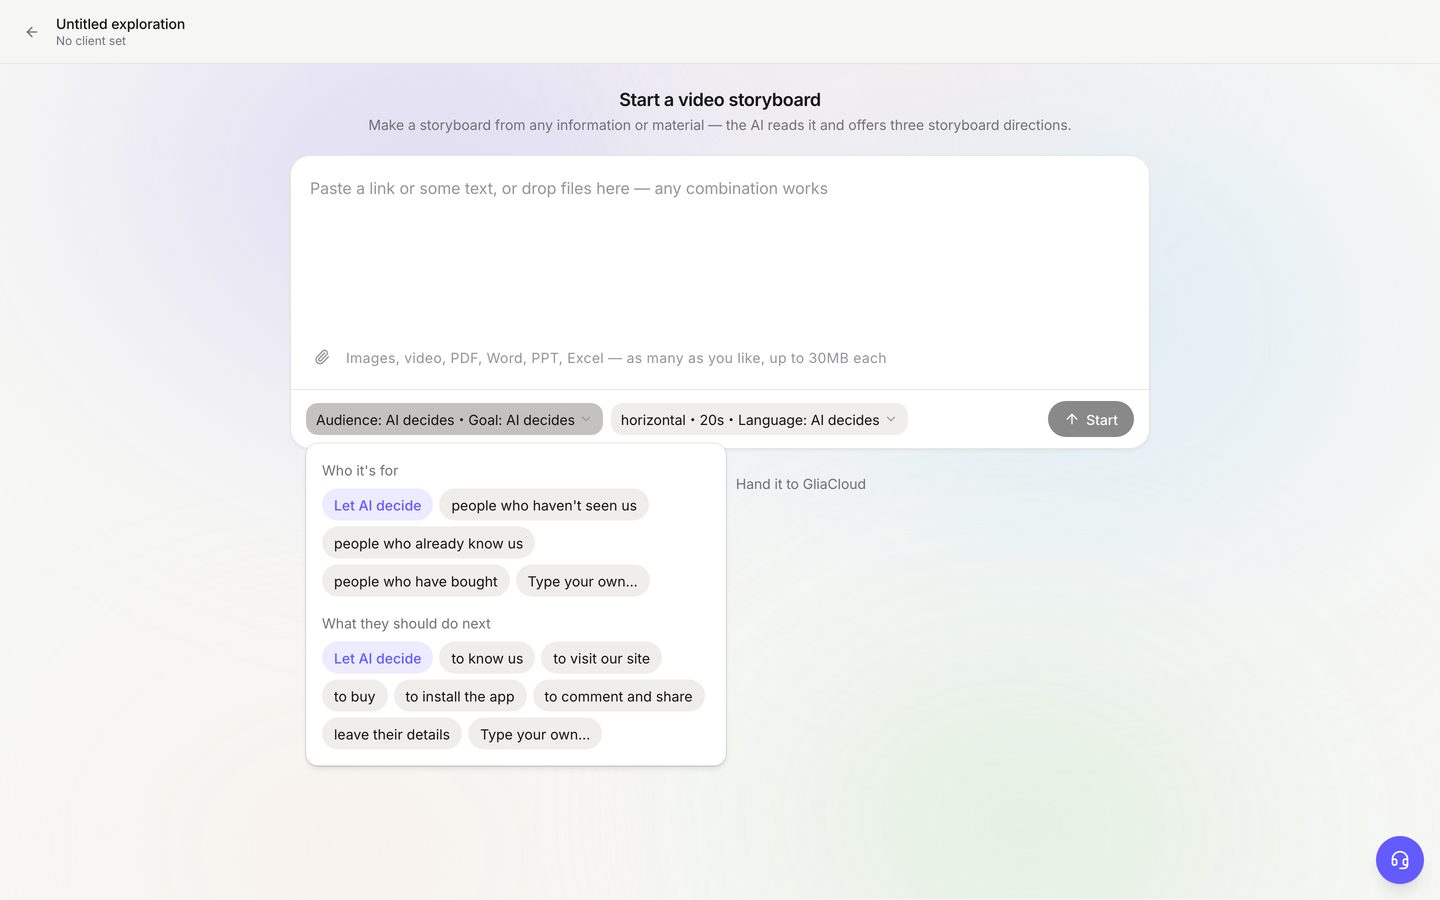
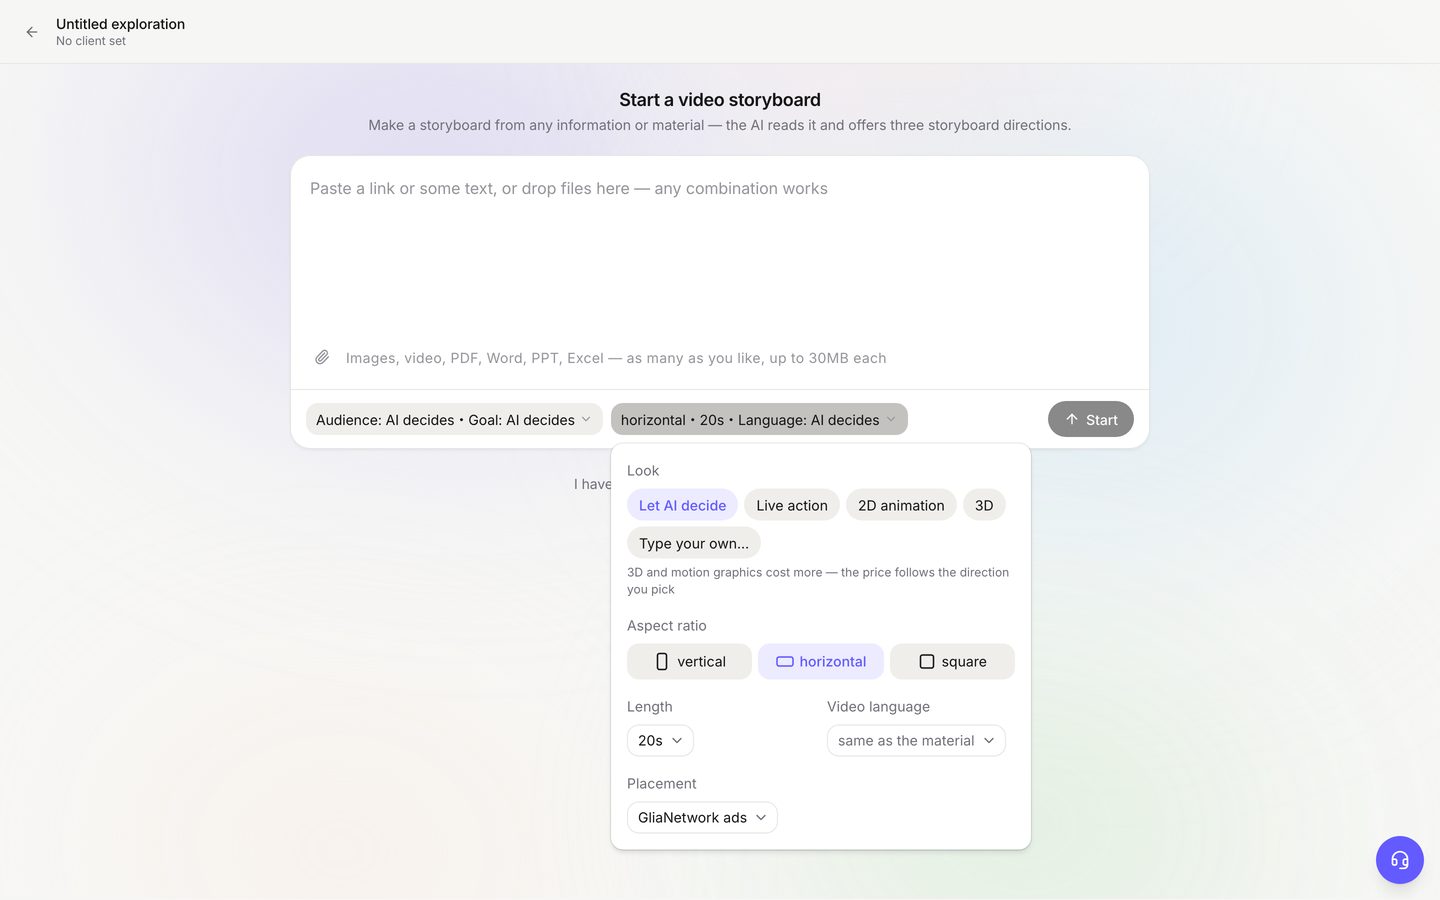
| Setting | Options |
|---|---|
| Who it's for | Let AI decide, people who haven't seen us, people who already know us, people who have bought, or type your own |
| What they should do next | Let AI decide, to know us, to visit our site, to buy, to install the app, to comment and share, leave their details, or type your own |
| Look | Let AI decide, Live action, 2D animation, 3D, or type your own |
| Aspect ratio | Vertical (9:16), horizontal (16:9), square (1:1) |
| Length | 6–120 seconds |
| Video language | Same as the material, or one of 13 languages |
| Platform | GliaNetwork ads, Official website, E-commerce platform, Instagram / Facebook Reels, TikTok, YouTube Shorts, YouTube in-stream, Instagram / Facebook feed |
I have a storyboard
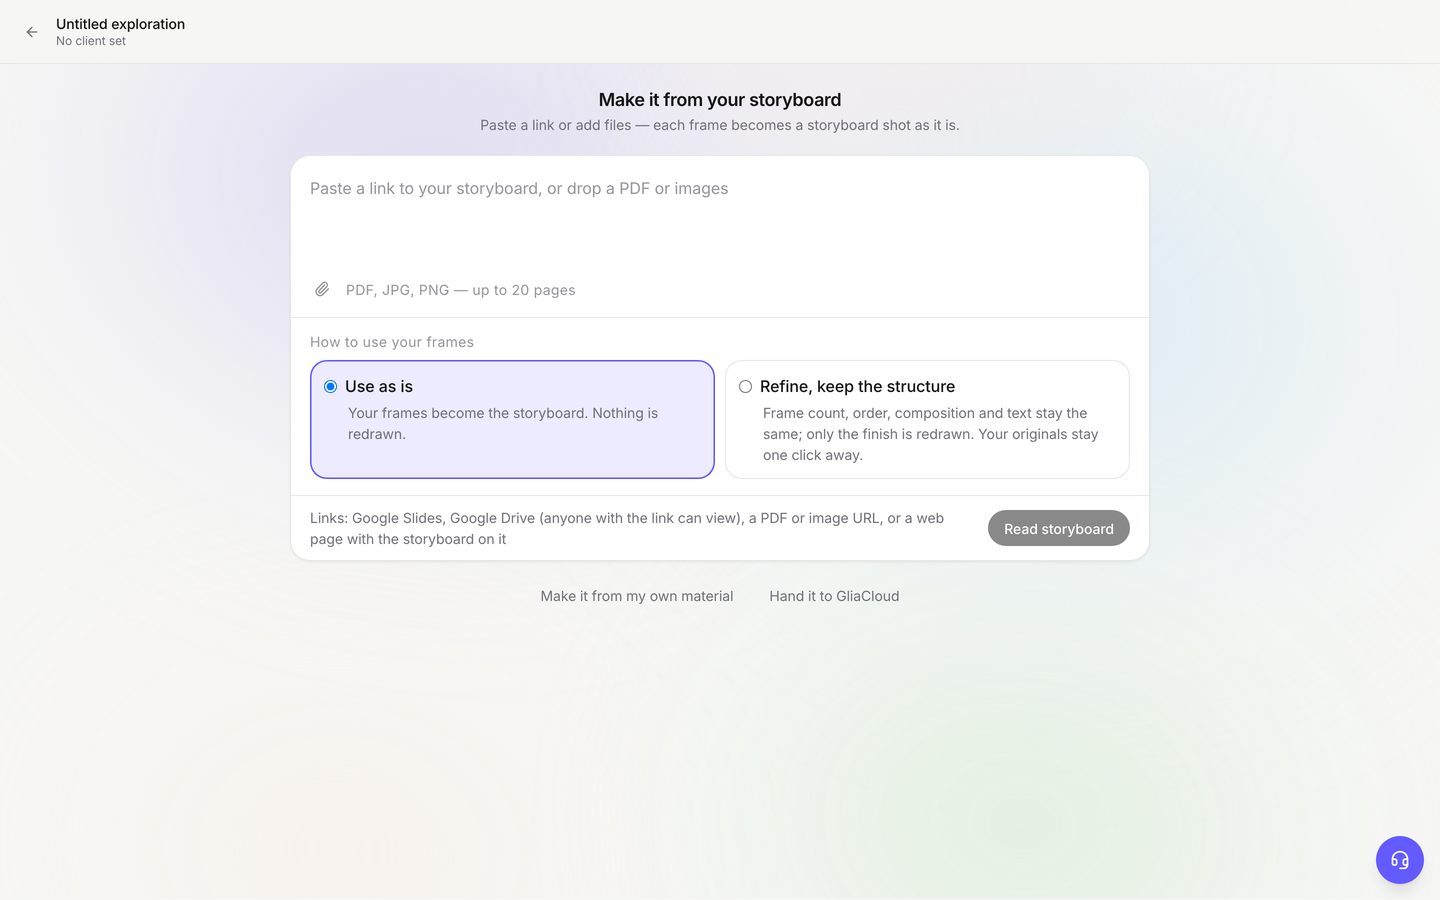
- Paste a link to your storyboard, or drop in PDF, JPG or PNG files, up to 20 pages. Supported links: Google Slides, Google Drive (shared so anyone with the link can view), direct PDF or image links, and web pages that contain the storyboard.
- Under “How to use your frames”, choose:
- “Use as is”: your frames become the storyboard as they are. Nothing is redrawn.
- “Refine, keep the structure”: the number of frames, their order, composition and text stay the same; only the images are redrawn to finished quality. You can switch back to the original at any time.
- Click “Read storyboard”. This takes about 30 seconds to a minute.
- In “Check what we read”, check each frame's image, text, voiceover and length. If it all looks right, click “Create storyboard” to go straight to Storyboard.
Hand it to GliaCloud
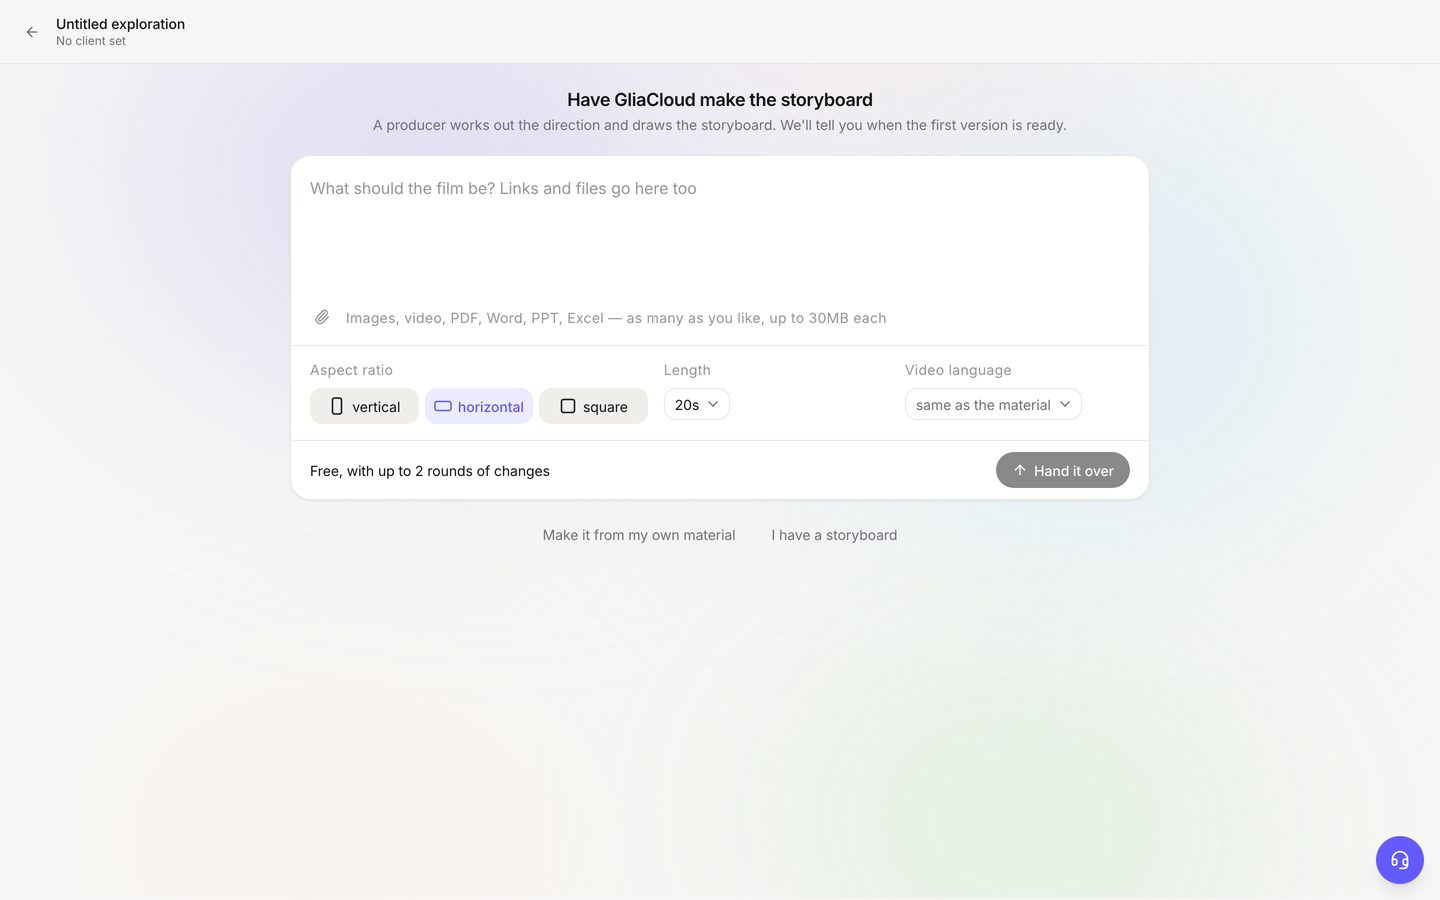
- Describe the video you want (just paste any URLs). Attach files if needed.
- Choose the aspect ratio, length and video language.
- Click “Hand it over”. This storyboard service is free and includes up to 2 rounds of changes.
For what happens once the first version arrives, see Have GliaCloud draw the storyboard.
Explore: pick a direction
Brief summary and your requests
The “Brief summary” bar at the top is what the AI took from your materials: audience, format, platform and number of materials. Click “View full brief” to open it below the bar, with the product, message, industry, market, the settings for this video, and “Your requests”. Pay special attention to fields marked “Detected from your assets — please confirm” or “Inferred”.
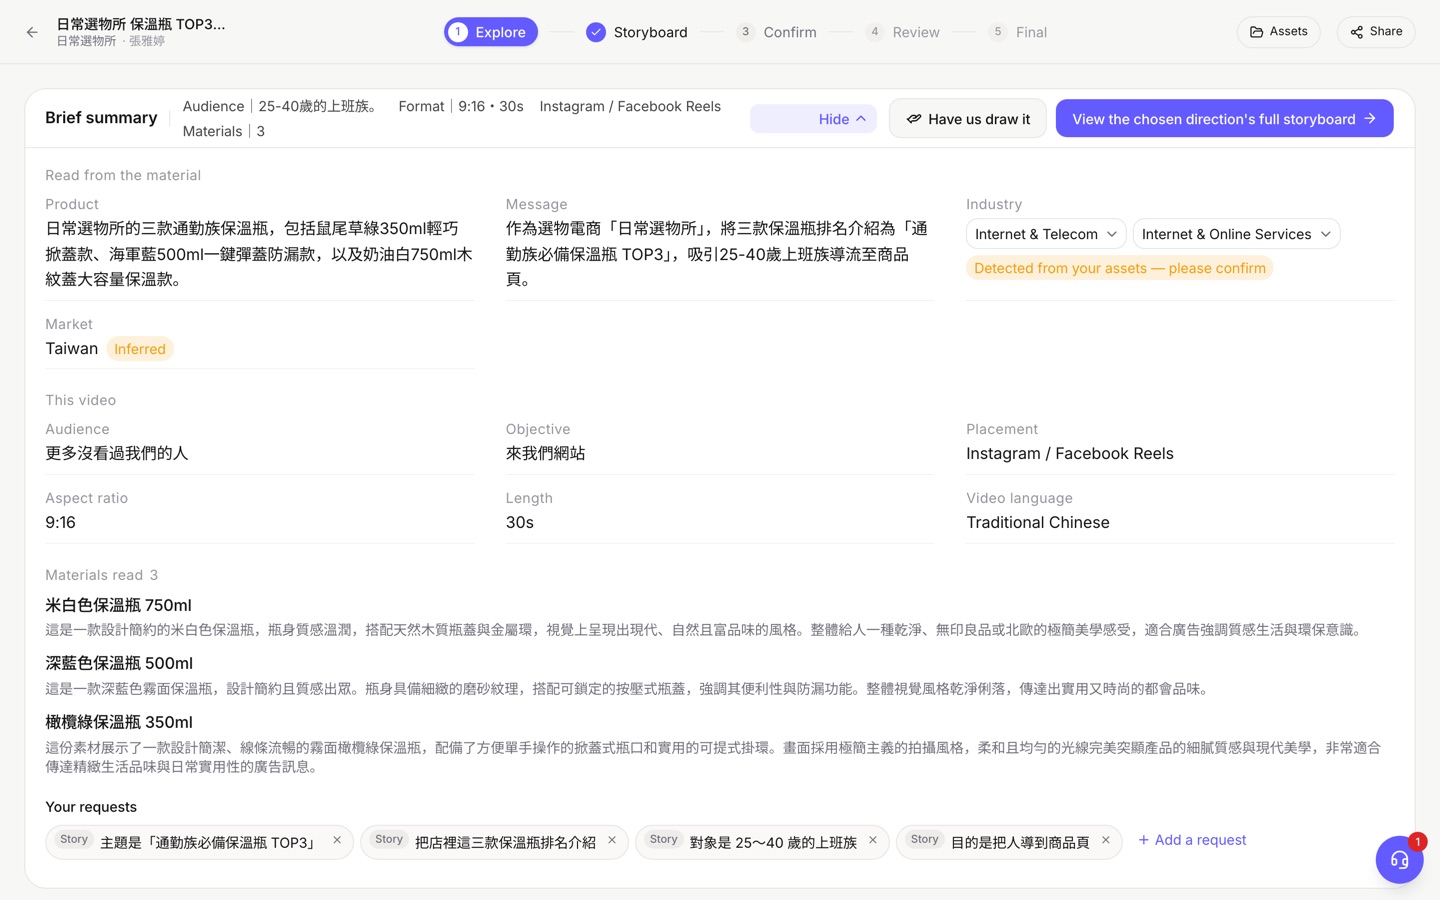
“Your requests” lists each requirement you wrote when you started the project. Each one is tagged with a type (for example “Story”). The AI checks every frame against these requests.
Compare the three directions
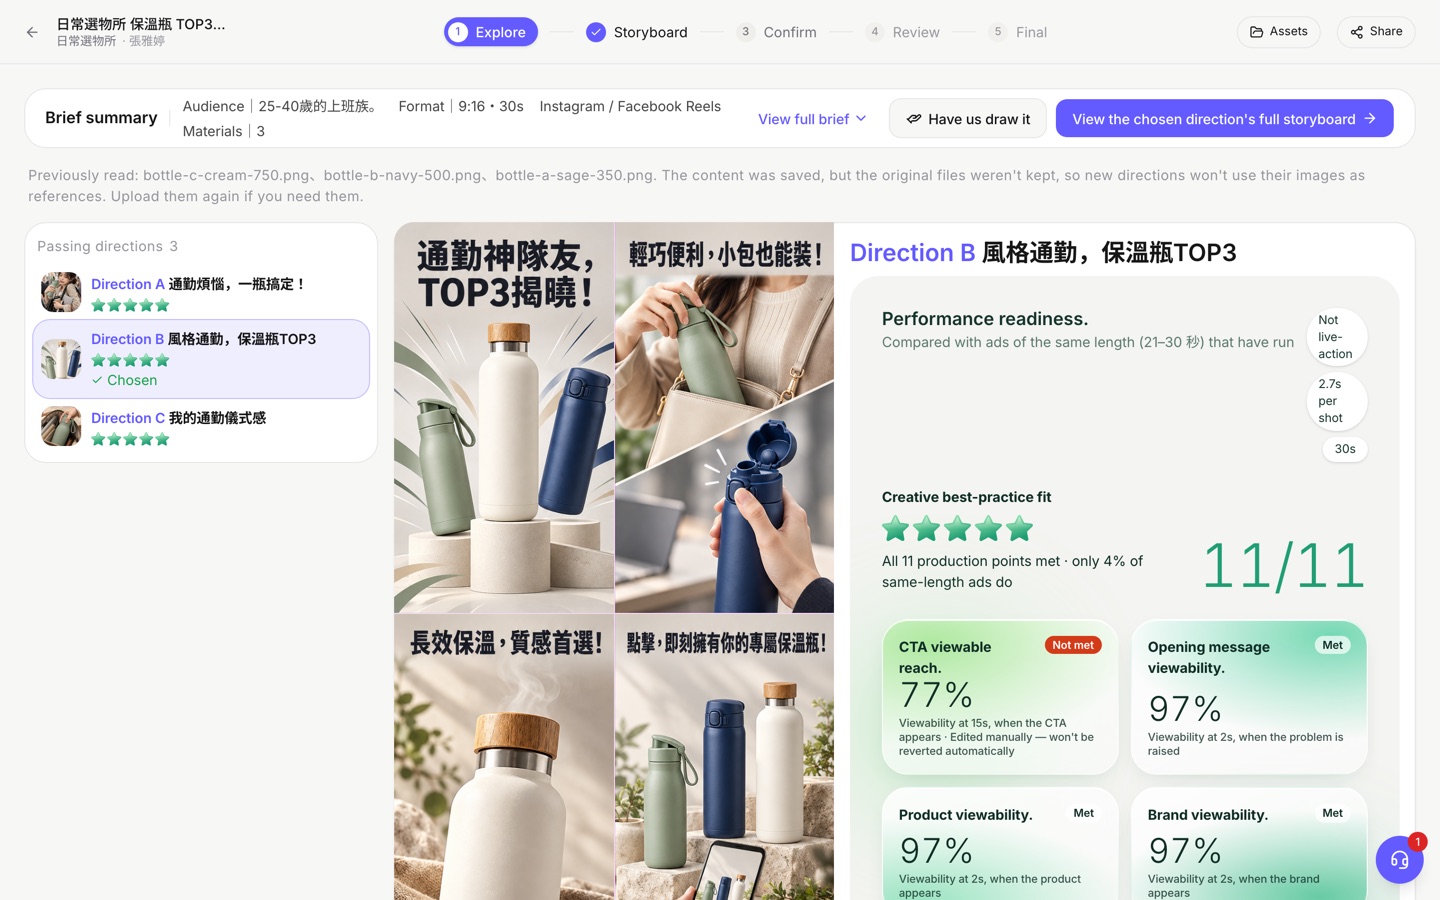
The left side lists “Direction A”, “Direction B” and “Direction C”, each with a star rating. Click a direction to see its four sample frames in the middle and its performance readiness on the right.
Performance readiness
Performance readiness checks how many of 11 production points the direction meets, for example whether the opening message, product, brand and CTA appear when they should. It compares against ads of the same length that have already run.
- The large number at the top right (for example 11/11) is how many points are met. The star rating is the “Creative best-practice fit”.
- Each small card is one point, such as “CTA viewable reach” or “Product viewability”, marked “Met” or “Not met”. The card shows what the result is based on, for example “Viewability at 2s, when the product appears”.
- This checks whether the storyboard follows the production points. It is not a performance forecast.
If you're not happy
- To change one image: click “Edit” on the image and choose “Change how it's told”, “Change how it looks” or “Redraw”. Or choose “Tell the AI…”, describe the change, and click “Redo with these changes”. The new image replaces the old one.
- If the whole direction is wrong: add or edit requests in “Your requests”, then click “Rethink the directions with these”.
Choose a direction
Click “Create the storyboard for Direction A” at the right end of the brief bar (the letter is the direction you picked), then click “Use this direction”. “Have us draw it”, to its left, hands the storyboard to GliaCloud (see Have GliaCloud draw the storyboard). The first time you choose, you'll be asked for the client name if you haven't entered one.
Storyboard: check and edit the storyboard
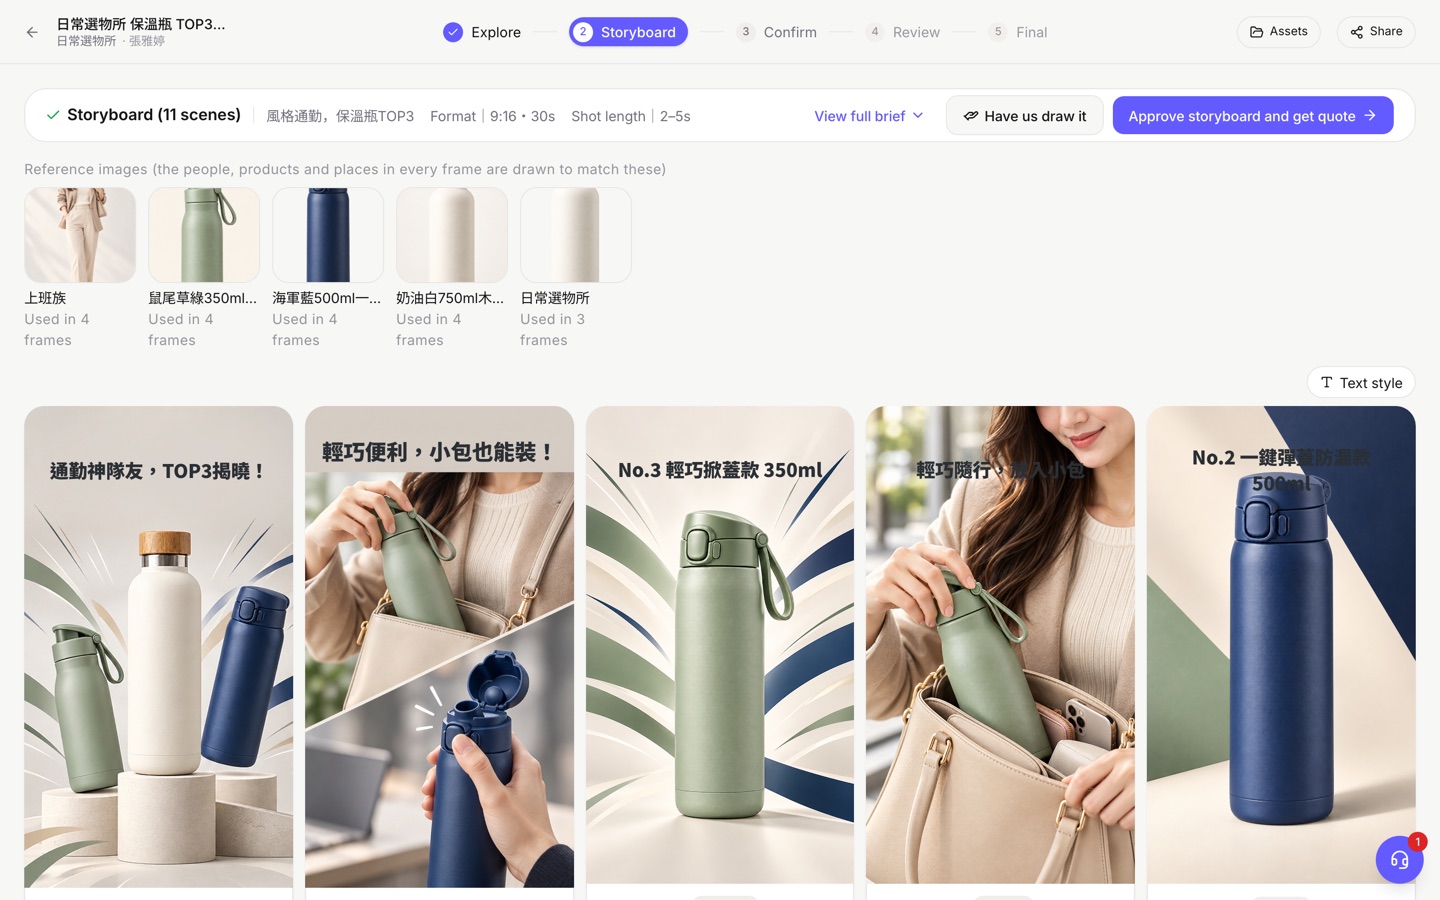
Each frame has an image, timing, key message, image description, on-screen text and voiceover. You can keep editing until you order. Get it the way you want, then check the quote.

Reference images
“Reference images” are what every frame is drawn to match when it shows a person, product or place. Under each one you'll see how many frames use it. Change a reference image and click “Apply (redraw N frames)”, and every frame that uses it is redrawn, so people and products stay consistent across the video.
- Logo: the file you marked as “Logo” in Assets is used as it is, never redrawn by the AI. With none marked, the storyboard has no logo reference.
- Product: if you marked a “Product photo”, the product is drawn to match it. Otherwise the AI first draws it from the front, side and top, so shots from any angle stay consistent.
For a more accurate logo and product, mark them in Assets before you start the project.
Edit a frame
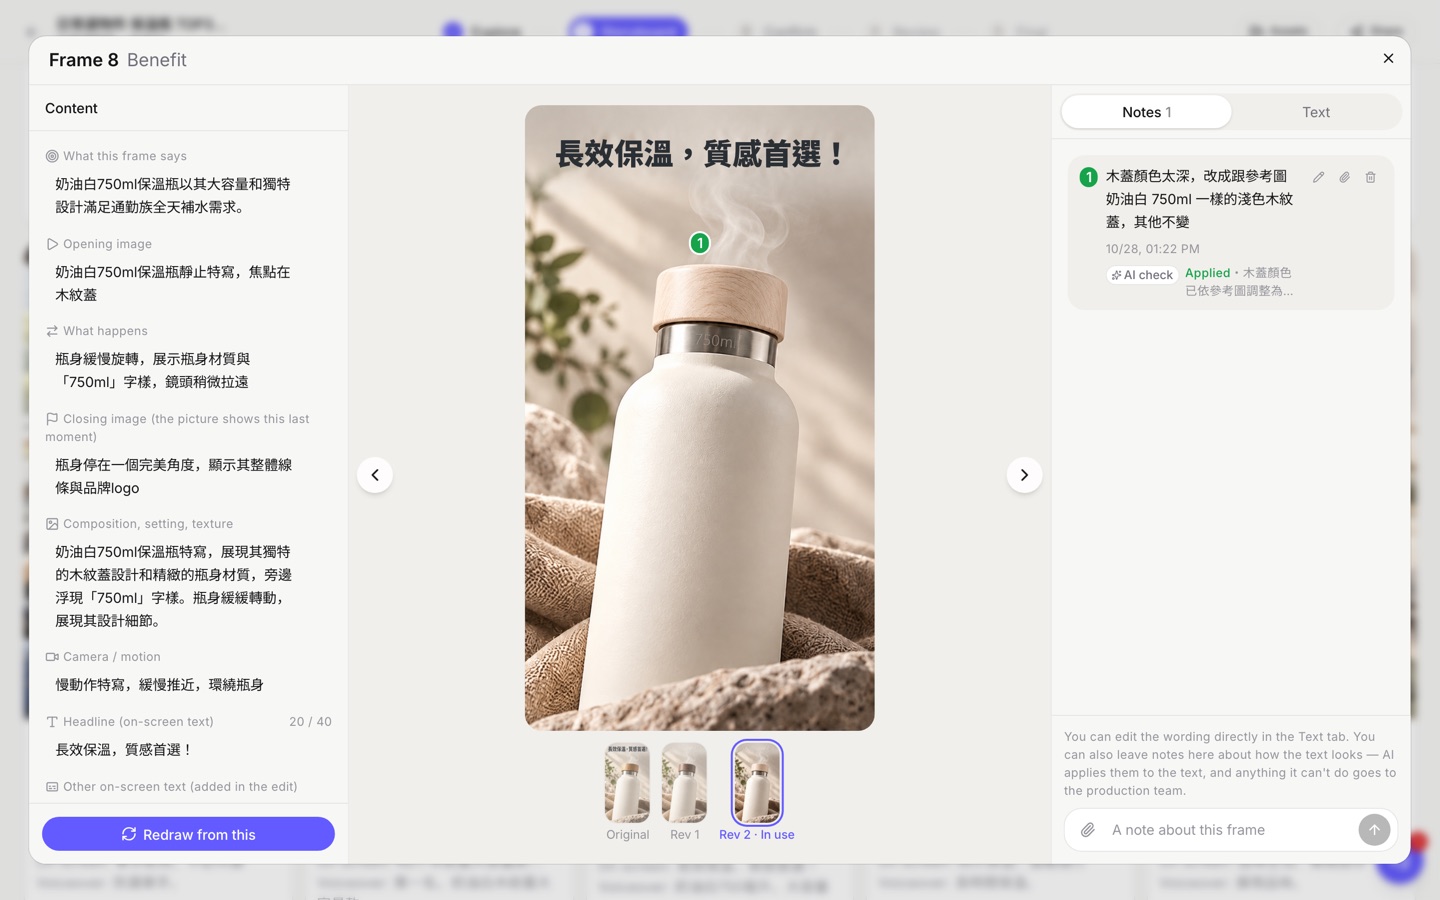
Hover over a frame to see “Edit”, “Redraw” and “This frame's text style”. Click “Edit” to open the edit window: “Content” on the left, and two tabs, “Notes” and “Text”, on the right.
| Where | How to use it |
|---|---|
| “Notes” tab (right) | Click the image to mark a spot, or drag to mark an area. Write what to change and press Enter. You can attach a reference image. When you're done, click “Apply these notes” and the AI redraws the frame. |
| “Content” (left) | Edit what the frame says, the opening and closing images, composition, camera, on-screen text, voiceover and music directly, then click “Redraw from this”. |
| “Text” tab (right) | Edit the on-screen text directly: wording, font, size, color, position and effects. |
- Notes the AI can't handle are marked “Passed to the production team”. The production team handles them after you order.
- Every edit is saved as a version. To go back, click “Original”, “Rev 1”, “Rev 2” and so on in the version bar.
Add, delete, reorder and change timing
- Add a frame: between two frames, choose “Add — let AI decide” or “Add — describe it”.
- Reorder: drag the cards.
- Change timing: click “−” or “+” under a frame. Each frame can be 1–20 seconds. Later frames shift earlier or later without being redrawn. The total length shows at the top. If it goes over the seconds included in the quote, a yellow notice appears.
- Delete a frame: click the delete icon on the card. The frame's image, all its versions and its notes are deleted too. This can't be undone.
Text style
Click “Text style” to set the font, colors and effects for the whole video, then click “Apply to all frames”. To change just one frame, use that frame's “This frame's text style”.
Have GliaCloud draw the storyboard
If you'd rather not edit it yourself, click “Have us draw it” on the storyboard page, describe what you want in “What you have in mind (optional)”, and click “Request”. The service is free and includes up to 2 rounds of changes.
- While we work on it, you can view the storyboard but not edit it. Send changes with “Ask for changes”. Everything you send at once counts as one round.
- When your rounds are used up, approve one of the versions, or take the storyboard back and edit it yourself.
- When you're happy, click “Approve version N and get a quote”.
- You can “Take it back” at any time, free of charge.
Get a quote
When the storyboard looks right, click “Approve storyboard and get quote”. You can still come back and edit after seeing the quote.
Confirm: check the quote and order
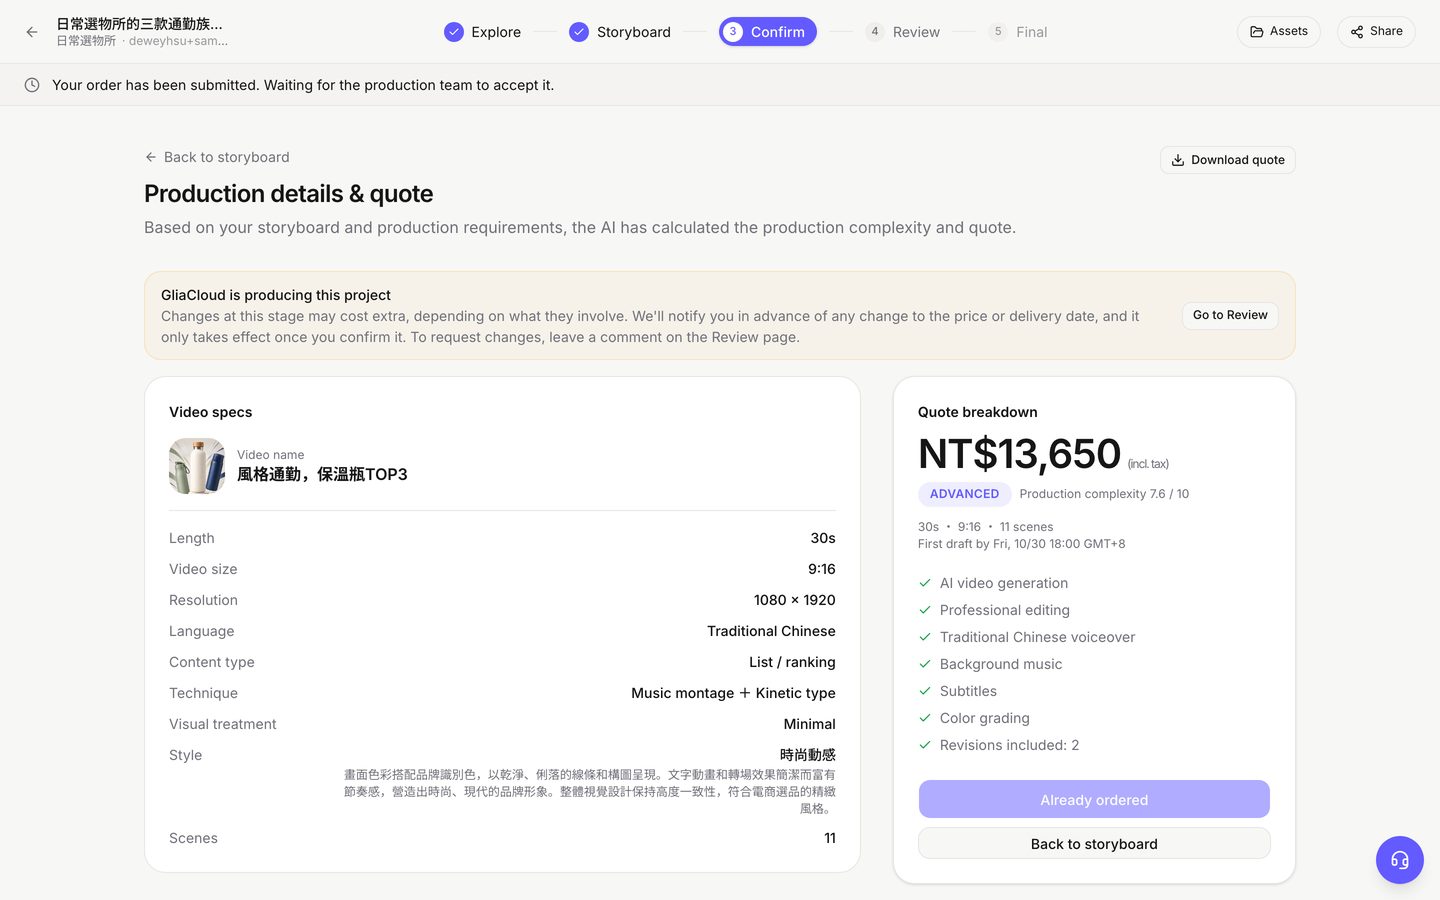
Once the storyboard is set, “Production details & quote” calculates the total including tax, the delivery date and the number of revisions included. Nothing is charged when you order; the amount is added to that month's statement. Click “Download quote” at the top right to save it as a PDF for your manager or finance team.
Video specs and production complexity
- Video specs: length, size, resolution, language, content type, approach, visual treatment, style and number of scenes.
- Production complexity: the AI scores five areas (production scale, visual consistency, motion and interaction, visual complexity, generation difficulty) and converts them into a difficulty level (for example ADVANCED 7.6/10). Click “See what makes up the difficulty” to see which frames raise the difficulty and how that affects the price. After editing the storyboard, click “Re-analyze quote” to recalculate.
How the price is calculated
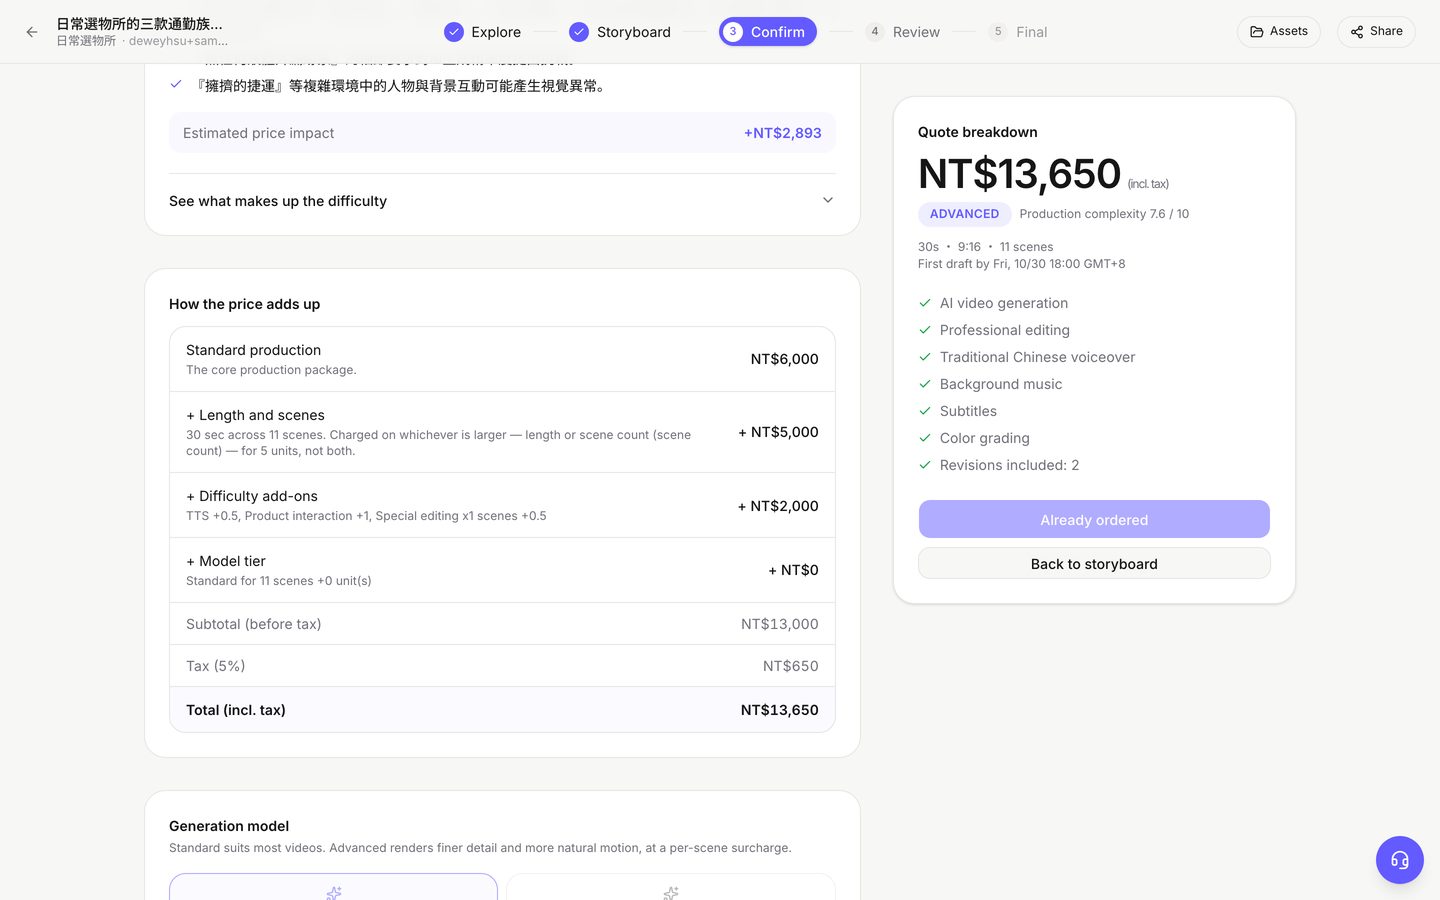
| Item | What it means |
|---|---|
| Standard production | The base production package |
| + Length and scenes | Length and number of scenes are each converted, and only the larger one counts. They aren't added together |
| + Difficulty add-ons | Voiceover, product interaction, special editing and so on |
| + Model tier | An extra charge per scene if you choose “Advanced” |
| Tax | Based on your account's billing country (see below) |
Because only the larger of length and scene count is charged, a storyboard with many frames may not get cheaper even if you shorten it.
- Generation model: “Standard” suits most videos. “Advanced” gives finer image detail and more natural motion, at an extra charge per scene.
- Adjust production requirements: lists ways to save, such as cutting revisions from 2 to 1 or dropping the voiceover for subtitles only. Each option shows how much it saves.
- If GliaCloud has set a price for this project, the breakdown shows an extra line, “Adjusted by GliaCloud”, with the reason, and you'll get a notification.
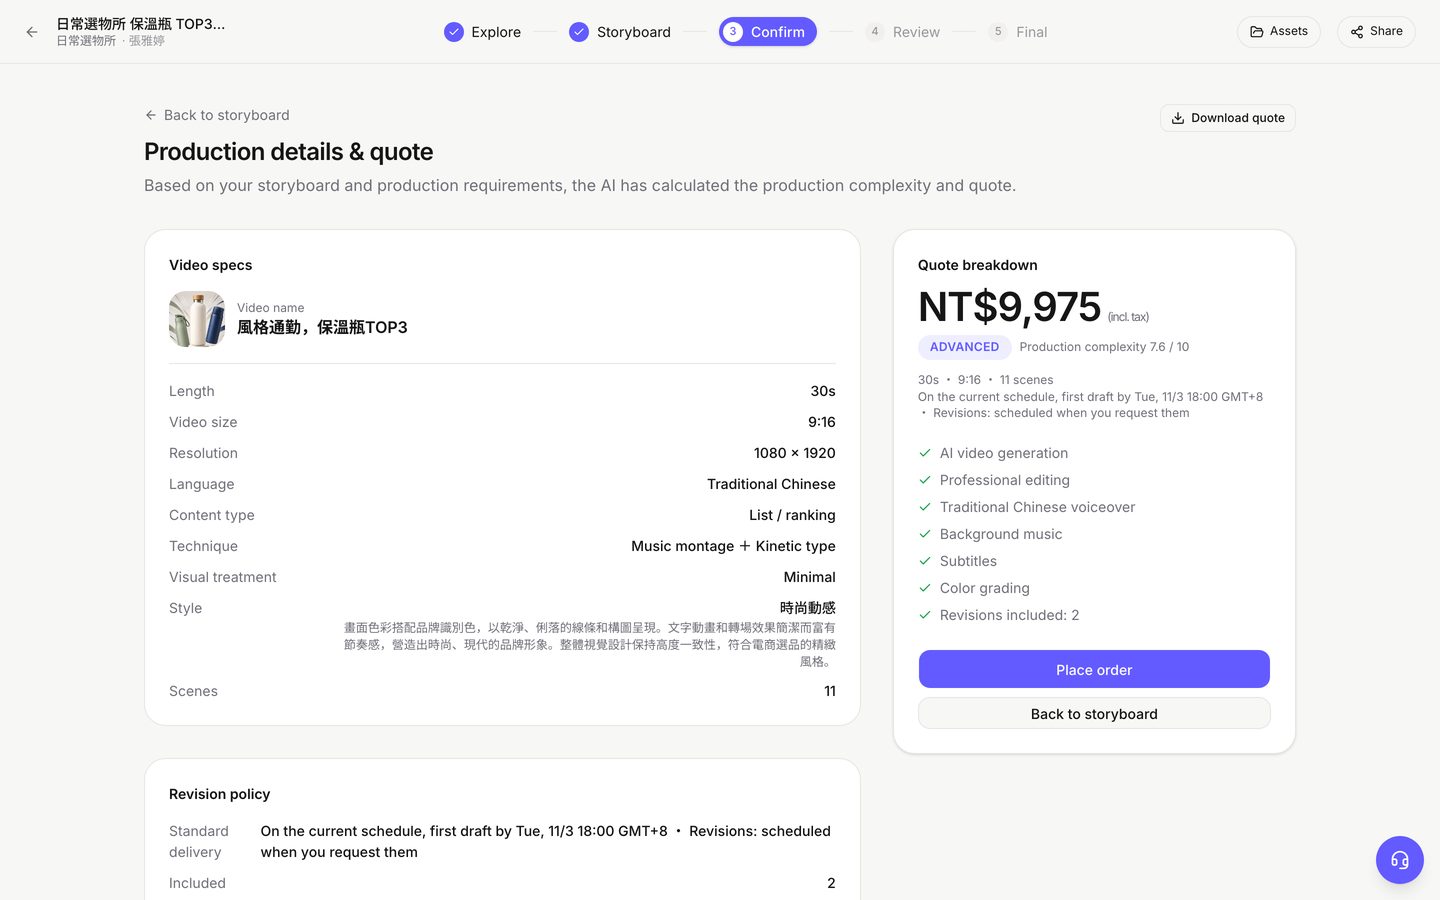
Delivery and revisions
- “First draft by” on the card on the right is when the first draft is delivered, not the final film. The date is based on the current production schedule.
- The quote shows how many revisions are included and the price per extra revision. Two lists, “What one revision covers” and “Quoted separately”, set out what a revision covers.
- In a hurry? Turn on “Rush delivery” to shorten the delivery time at a higher price. If the schedule is full, you'll see “We can't deliver by that date”.
Currency and tax
| Account billing country | Currency | Tax |
|---|---|---|
| Japan | Japanese yen | Consumption tax 10% |
| Taiwan | New Taiwan dollars | Business tax 5% |
| Other countries | US dollars | No tax |
The amount when you order is the final amount. Later exchange-rate changes don't affect it. To change your billing country, contact GliaCloud.
Place the order
- Click “Place order”, then click “Place this order” in the confirmation window.
- The screen shows “Order submitted”, the work order number and the estimated delivery date. Wait until this appears and the button changes to “Already ordered” before you close the page.
- Click “View order status” to go to Review.
In some cases the button is different:
| Situation | What you see |
|---|---|
| Your account isn't activated yet (an older account that wasn't made through an invite link) | “Your account is awaiting approval”. You can't order, but you can keep editing the storyboard and checking the quote |
| You're a “Member” of your team | “Ask an admin to approve”. The order is sent only after an admin clicks “Approve and place order” |
| GliaCloud is still drawing your storyboard | “Approve the storyboard first” |
After you order, if GliaCloud needs to adjust the price or delivery date, you'll get a notification and can choose “Accept this change” or “Decline”.
Review: watch the draft and request changes
When the production team delivers the first draft, you leave change requests on the video's timeline. Each submission counts as one revision. When you're happy, approve it.
Order progress
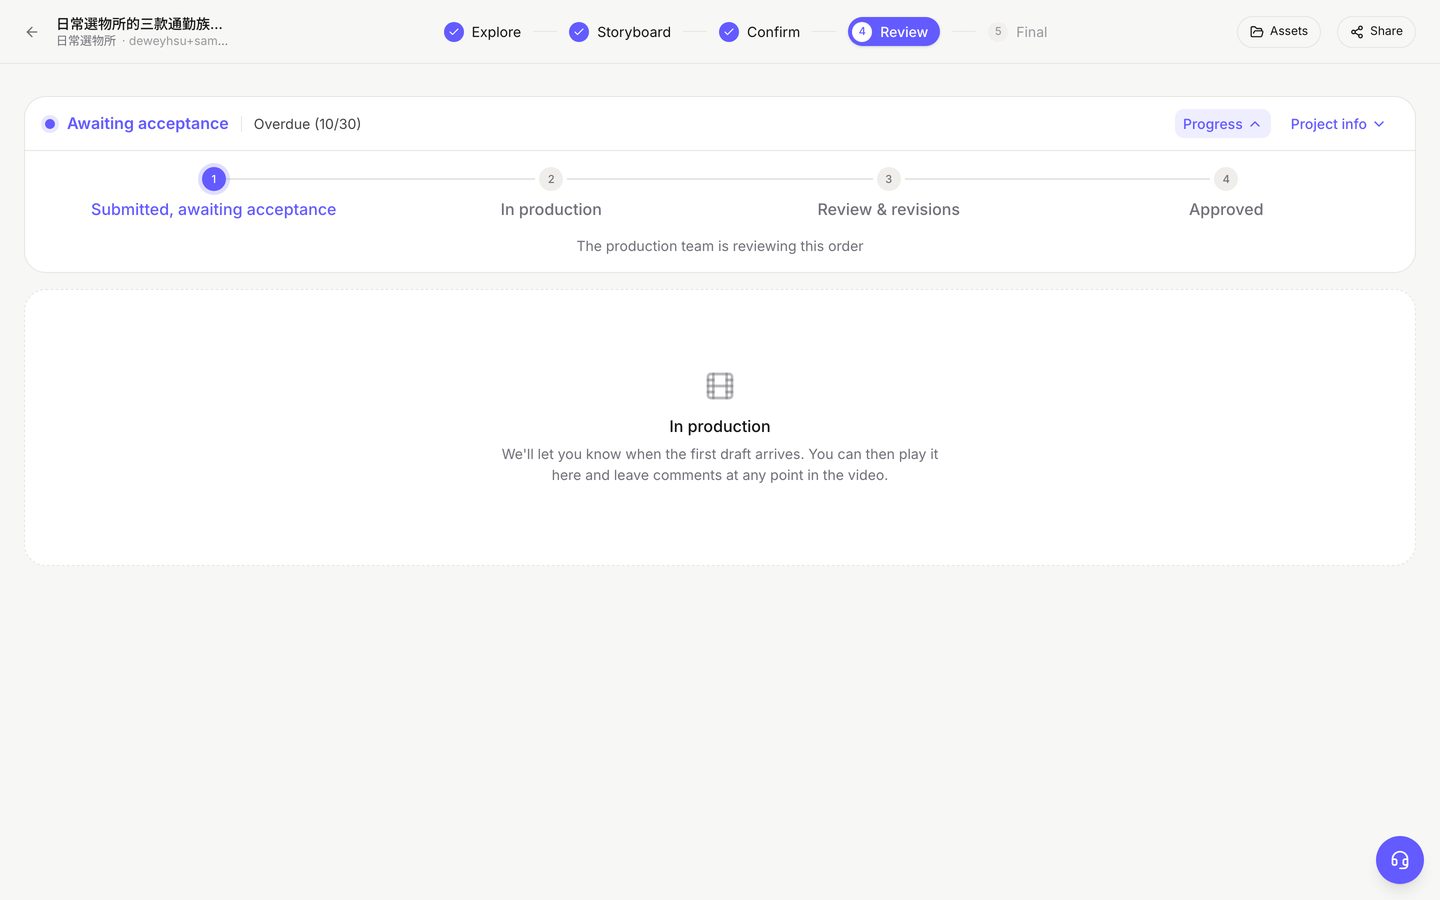
The status bar at the top shows the current status and delivery date. An order goes through these steps: “Submitted, awaiting acceptance” → “In production” → “Review & revisions” → “Approved”. “Project info” shows what you ordered. You'll get a notification when the first draft arrives.
Leave change requests
- Drag the timeline to the point you want changed and click “Note at this moment”.
- Write what to change. If needed, use “Mark a spot on the frame” or “Attach an image or file”.
- Your note is saved as a “Not sent” draft. You can keep adding more.
- When you've written everything, click “Send revision request”.
Each note is marked to show whether it's within the revision scope: “Included in the revision”, “Likely to add cost or time” or “GliaCloud will confirm”. You can comment only on the latest version. Older versions are view-only.
Talk with the production team
After sending, you can reply under each note or add details. The production team's replies appear in the same place.
When a new version arrives
Compare it with the previous version and mark each note “Fixed” or “Not fixed”. Notes marked “Not fixed” are added to the next revision request automatically.
Revision rounds
The screen always shows how many revision rounds you have left. When they're used up, you'll see “No free revisions left”. If you need more, click “Add revision round”.
Approve
When you're happy, click “Approve Version N”. You can approve any version that has been delivered.
Final: download the film and make more versions
Once you approve, the project closes and you can download the film here. If you need other sizes or languages, you can make them from this film. It costs less than starting over.
Download and share
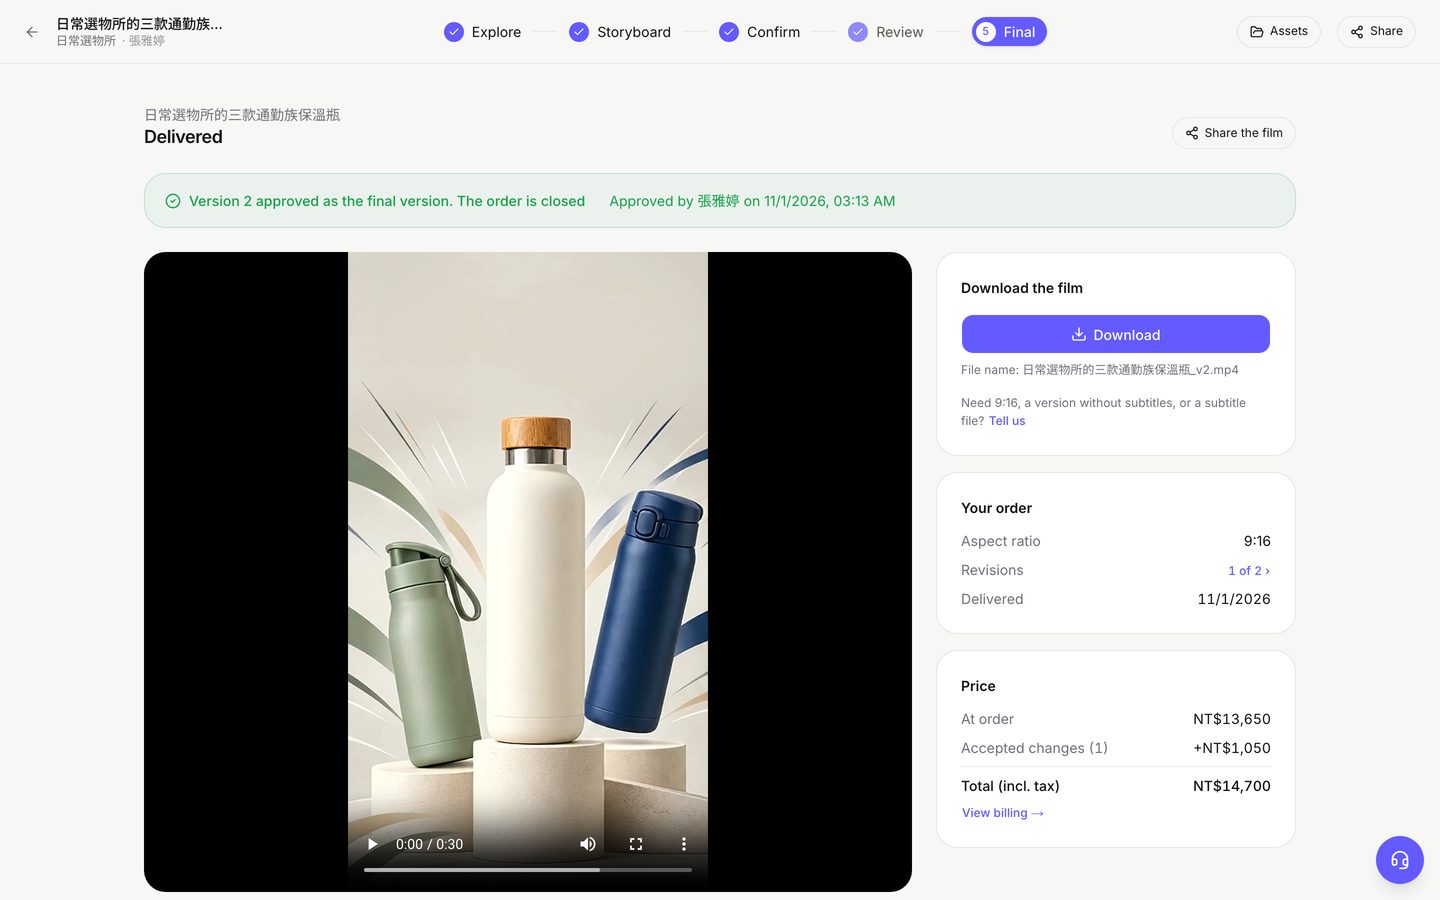
- Under “Download the film”, click “Download”. If the file hasn't been uploaded yet, the production team will notify you once it is.
- This page also shows “Your order”, “Price” (with “View billing”) and “Revision history”.
- Use “Share the film” at the top right to share the film with others.
Make more versions
Under “Make more from this film”, choose what to change. The storyboard and edit are reused:
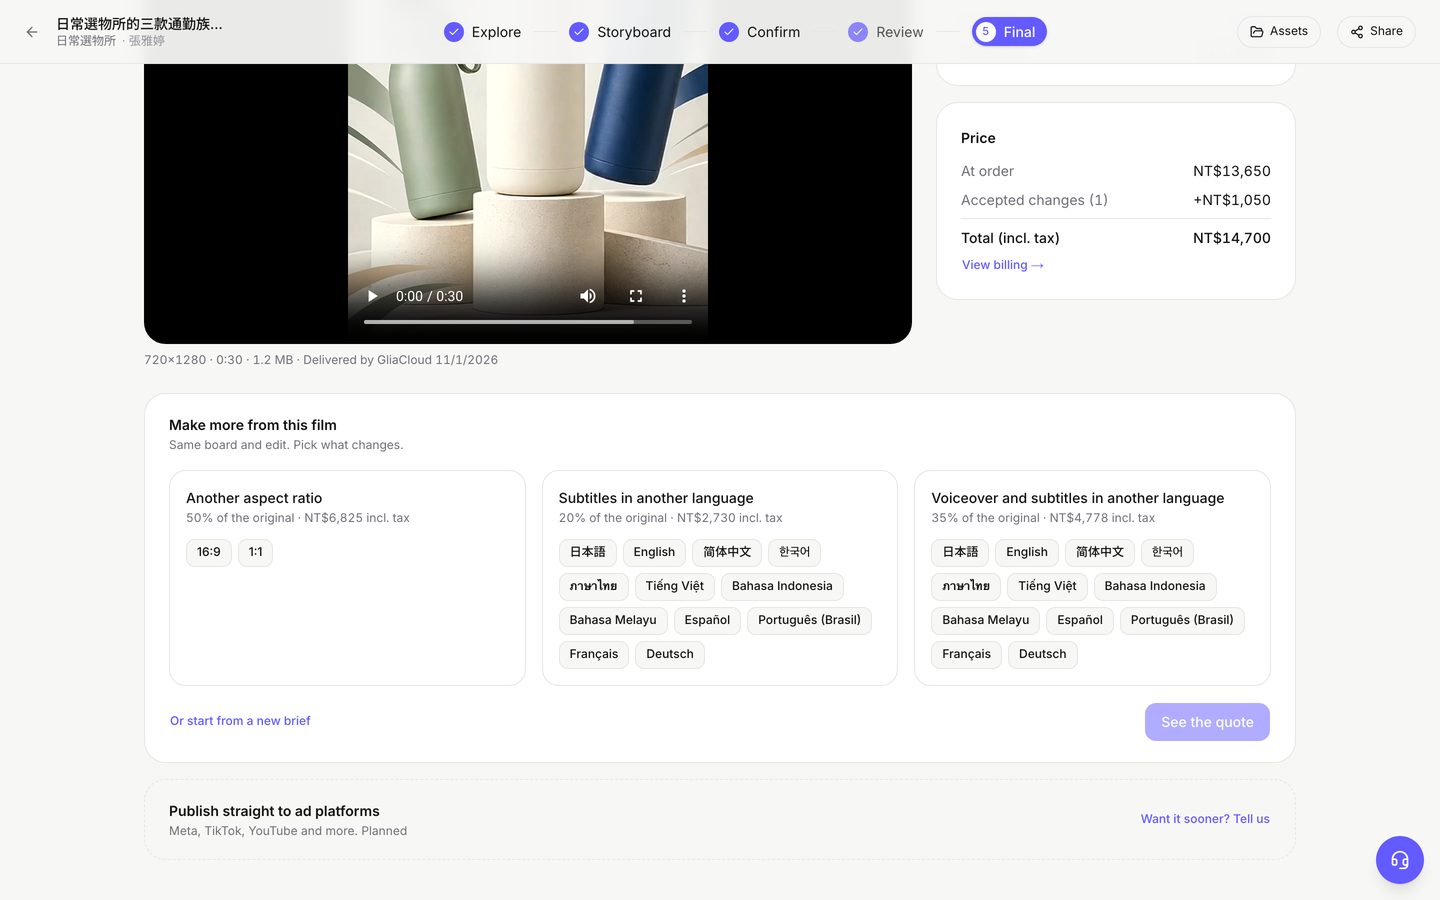
| Option | Price (share of the original film's price) |
|---|---|
| Change the aspect ratio | 50% |
| Change the subtitle language | 20% |
| Change the voiceover and subtitle language | 35% |
- After choosing, click “See the quote”. A new derivative project is created and opens at its Confirm step. The final amount is the price including tax shown on the card.
- The derivative project reuses the original storyboard, which can't be edited. It includes 1 revision.
- Ordering, review and download work the same as in any other project.
To make a new video from scratch, click “Or start from a new brief”.
Other features
Share links
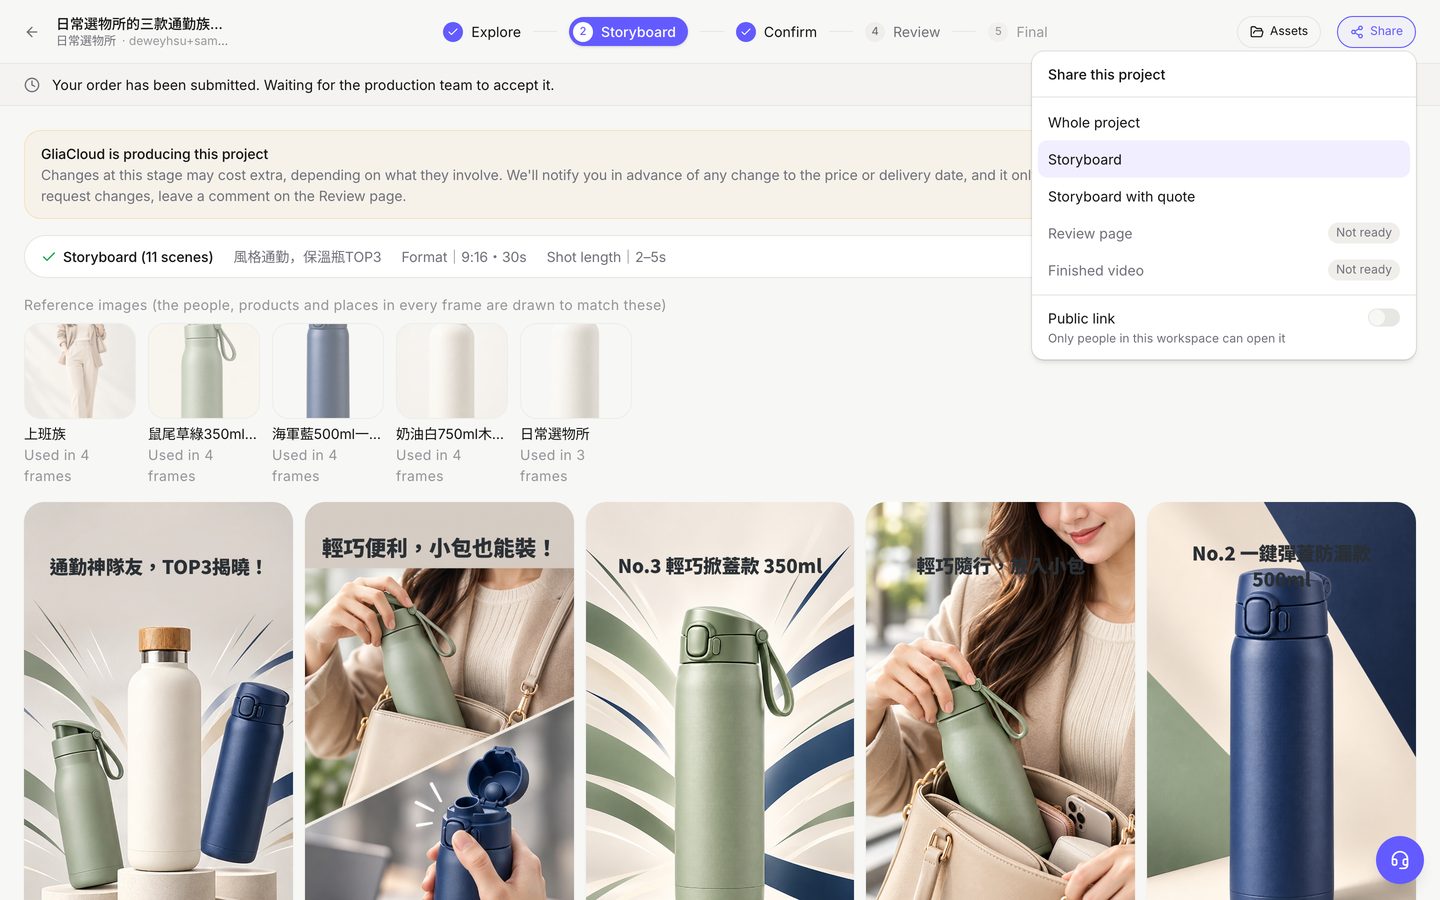
- Choose what to share: Whole project, Storyboard, Storyboard with quote, Review page or Finished video.
- Turn on “Public link” and anyone with the link can view it without an account. This works well for managers or the brand. When it's off, only members of your team can open it.
- If you include the quote, people who open the link will see the amounts too.
- Shared pages are view-only.
Assets and brand kits
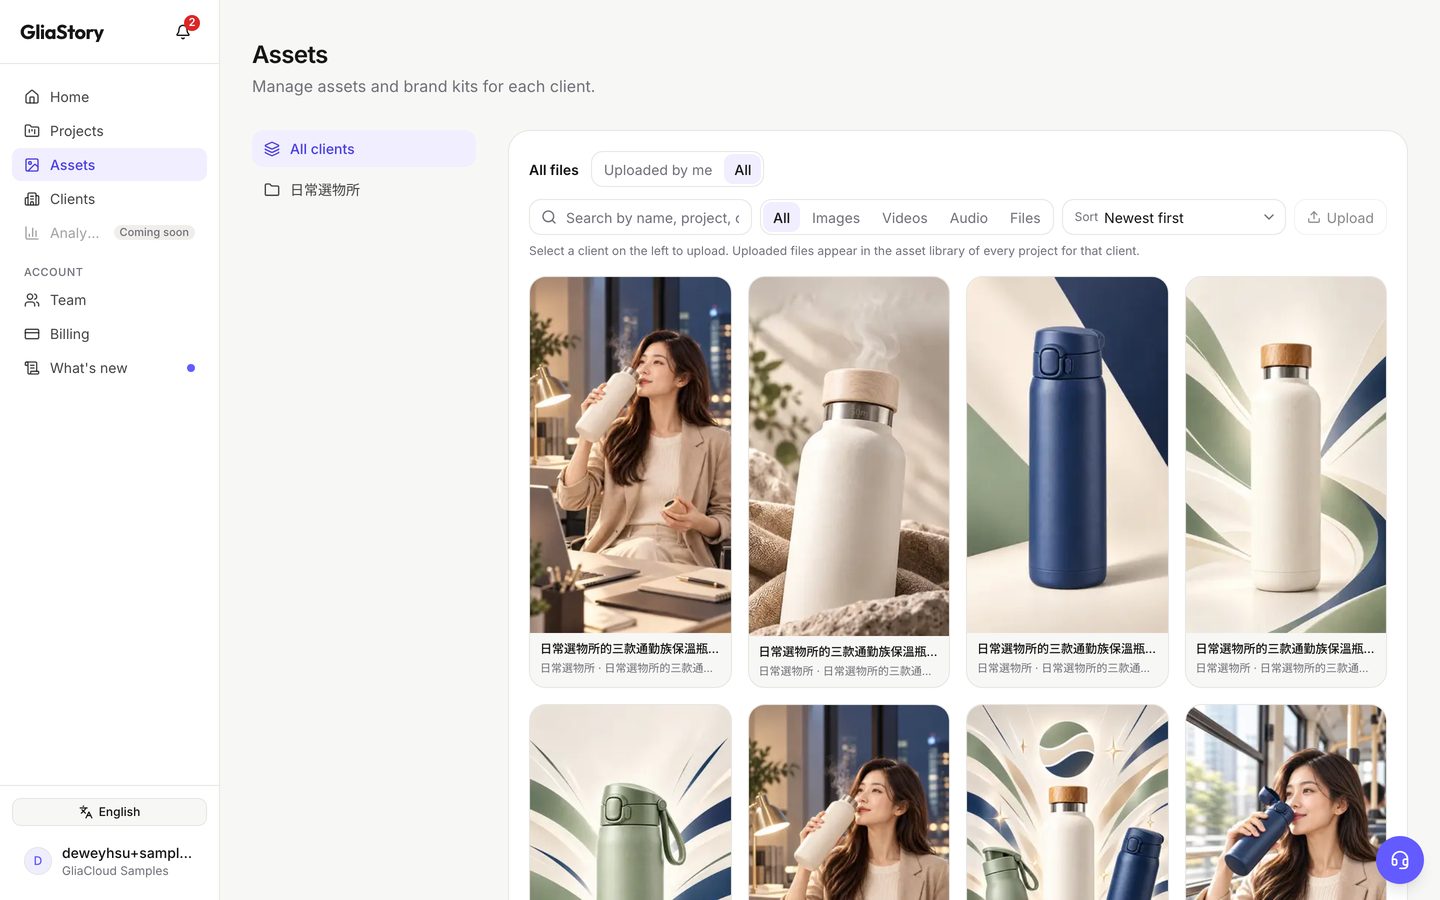
- Everything you upload in a project is kept here. You can also add files directly with “Upload”.
- Mark a file as “Logo” or “Product photo”: storyboards use the logo file as it is, and draw the product to match the photo.
- Each client has its own brand kit: website, logo, primary color, typography, preferred style, tone of voice and phrases to avoid.
- Paste a URL in “Website” and click “Draft with AI”. The AI works out the brand's tone and colors from the website. Fields the AI filled in are marked “AI draft”. Fields you've edited aren't overwritten if you draft again.
Samples
“Samples” in the sidebar lists complete projects chosen by GliaCloud, by your account's country. Open one to go from Explore to Final: the directions, storyboard, quote, each review version and the finished film. Samples are view only, can't be edited, and cost nothing.
Team and permissions
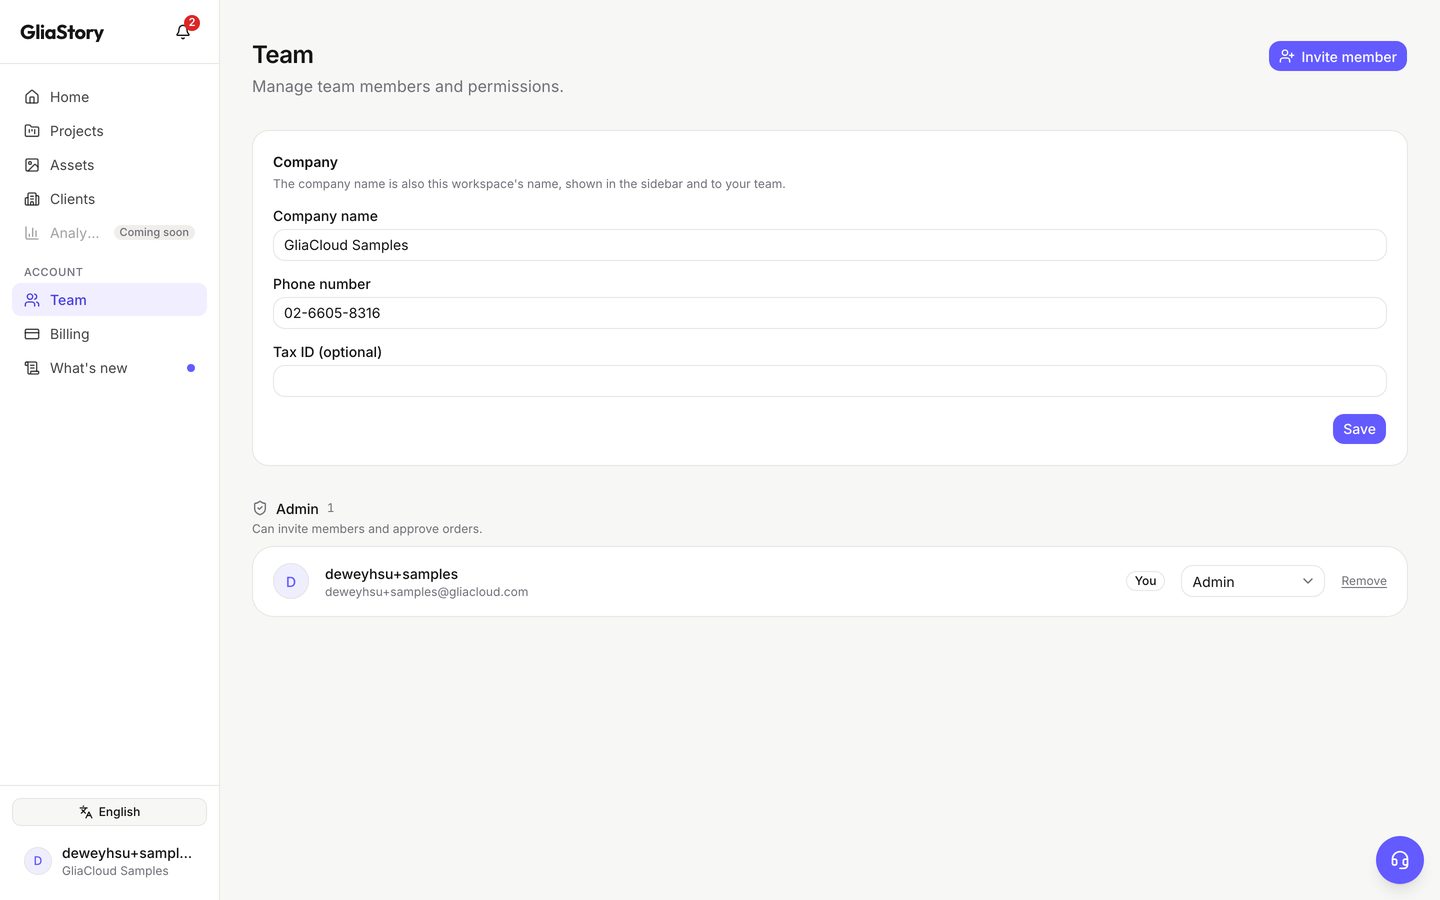
| Role | What they can do |
|---|---|
| Admin | Invite members, approve orders, edit company details |
| Member | Create and edit projects. Orders need an admin's approval |
To invite a colleague, an admin clicks “Invite member”, enters their email, and clicks “Create and copy invite link”. Then send them the link yourself. Only someone signed in with that email can use it, and it's valid for 7 days.
Billing
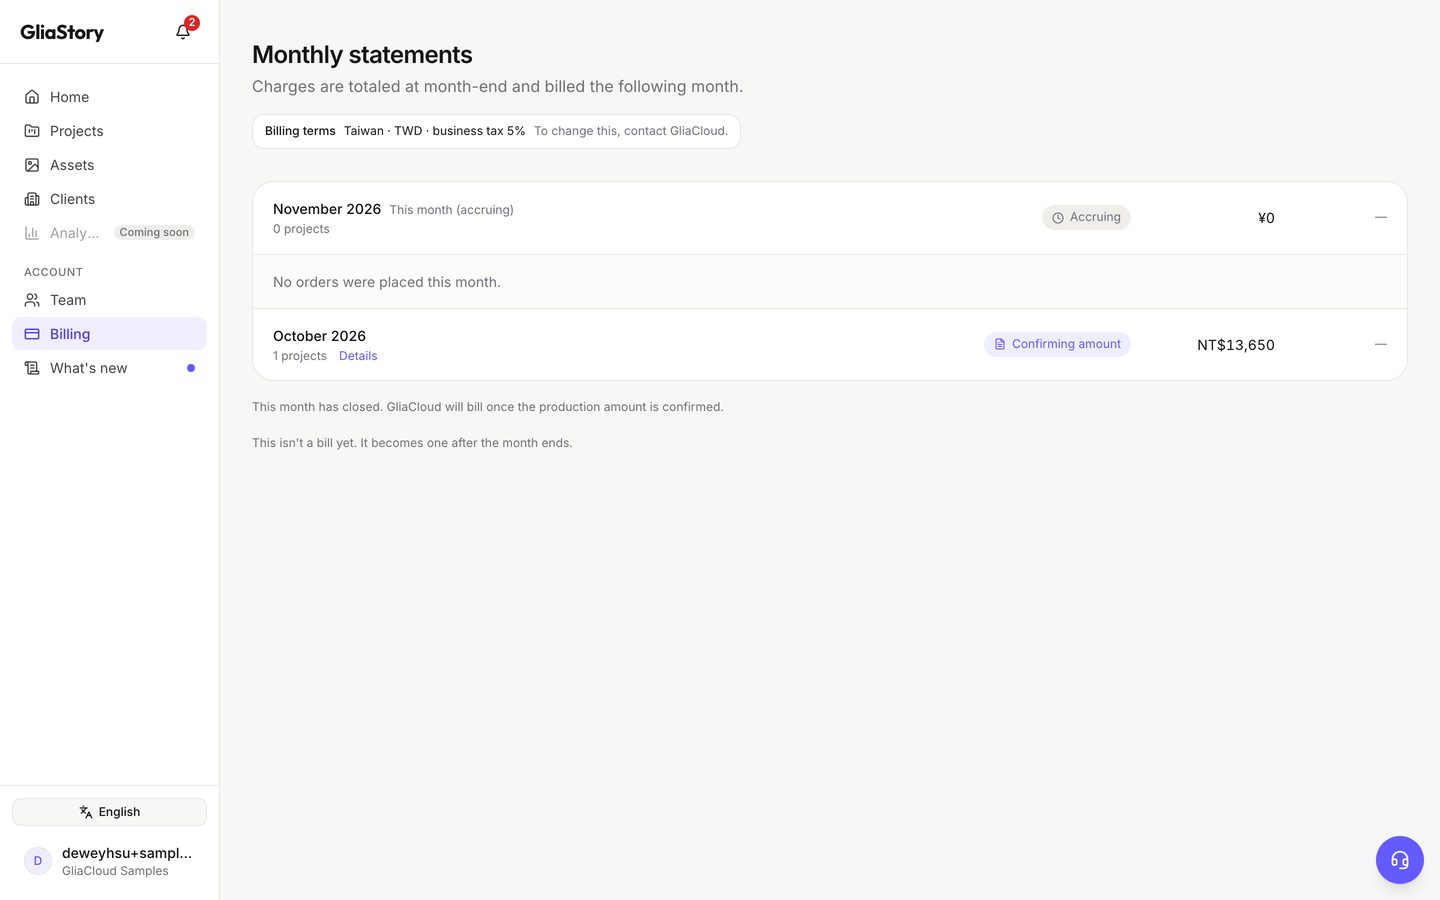
Charges are totaled at the end of each month and invoiced once the following month. A statement's status is “Accruing”, “Confirming amount”, “Awaiting payment” or “Paid”. Click “Details” to see each item, or use “Print / save as PDF”.
Notifications
The bell in the sidebar tells you when a draft is ready to review, the production team has replied, a price or delivery change needs your confirmation, your account has been activated, and so on. On the “Notifications” page you can “Mark all as read” or show “Unread only”.
Contact support and report a problem
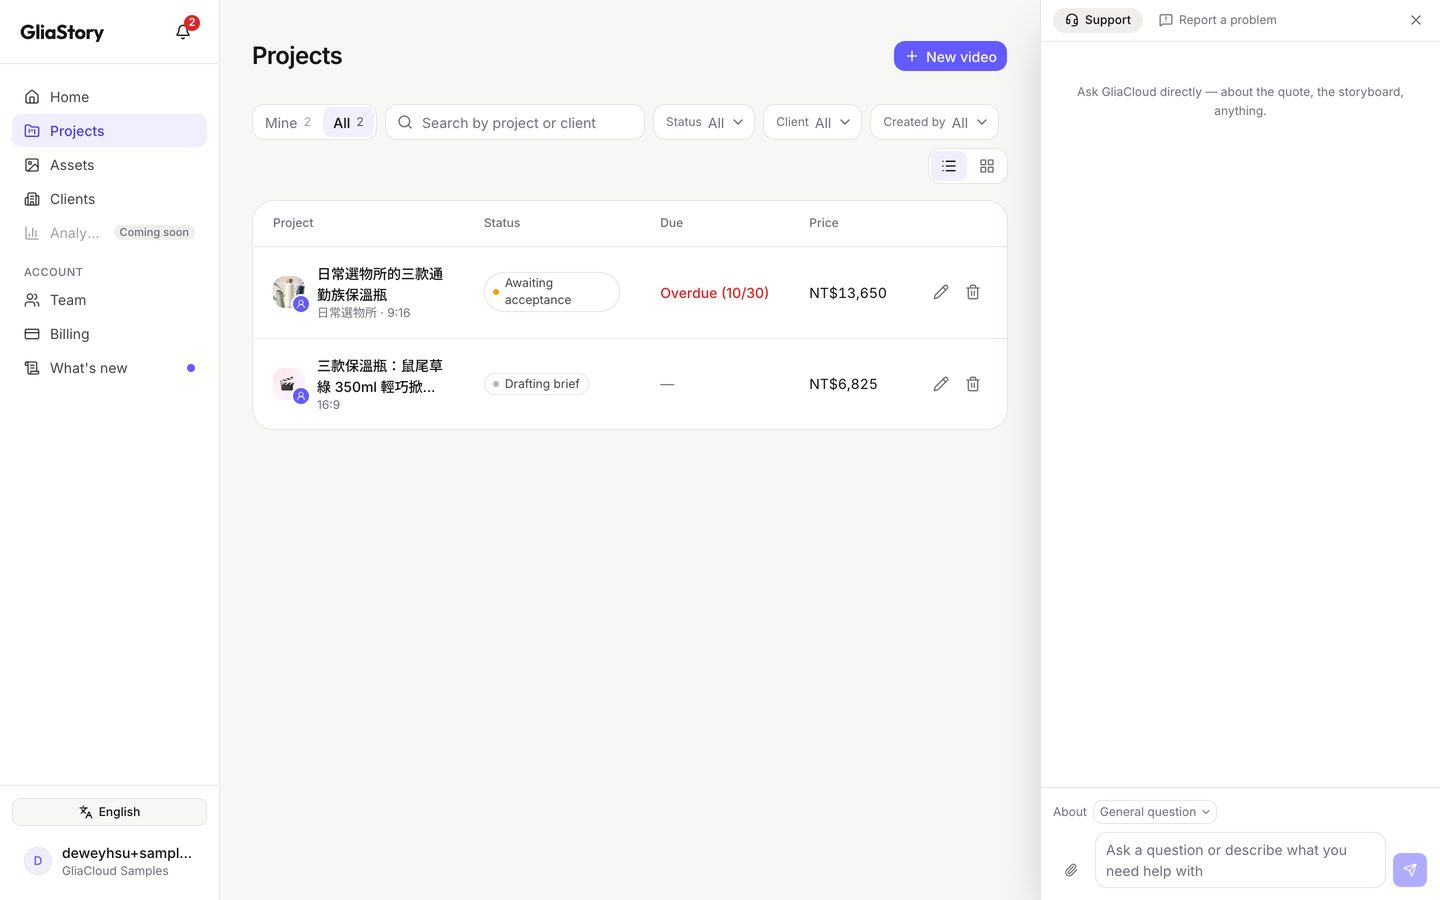
- “Support”: chat directly with GliaCloud staff. Ask about anything, from quotes to storyboards. Hours are Monday to Friday, 9:00–18:00. We usually reply within 2 business hours.
- “Report a problem”: report a problem or send a suggestion. You can attach a screenshot. The page you were on is sent along with it, so we can look into it.
FAQ
- When do charges start?
- After you click “Place this order”. Explore, Storyboard and viewing the quote are free, and so is having GliaCloud draw the storyboard.
- Can I switch directions after choosing one?
- Not within the same project. You can make big changes in Storyboard with notes and the “Content” tab, or start a new project.
- What counts as one revision?
- Each click of “Send revision request” in Review counts as one, however many notes it contains.
- Can I order if I'm not an admin?
- You can go as far as the quote. Click “Ask an admin to approve”, and an admin on your team approves and places the order.
- Can I edit the storyboard after ordering?
- Not directly. Leave a comment on the Review page and the production team will assess it. We'll ask you to confirm any extra cost or change to the delivery date first.
- Which currency is used?
- Japanese yen for clients in Japan, New Taiwan dollars for clients in Taiwan, and US dollars for all other countries.
- Who do I contact with questions?
- Use “Contact support” in the bottom-right corner, or contact your GliaCloud sales representative (info@gliacloud.com).